Payment Received/Receipt:
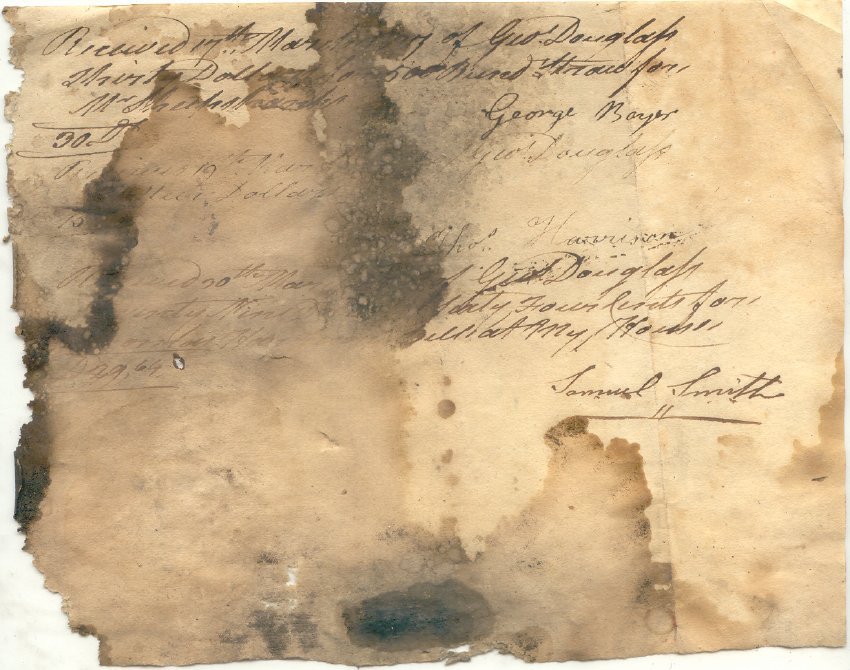
Three Dates: 17th March 1827, 19th March 1827, 30th March 1827
Signed off by George Boyer, Thomas Harrison, and Samual Smith on payments received by George Douglass for; Mr. Sheepshank and himself.
"Received 17th March 1827 of George Douglass
Thirty Dollars for 500 Bined Straw for
Mr Sheepshank
---------
30 D George Boyer
---------
Received 19th March 1827 of George Douglass
Fifteen Dollars
---------
15 Tho[mas] Harrison
---------
Received 30th March 1827 of George Douglass
Twenty nine Dollars and sixty four cents for
Thomas Harrison bill at my house
----------
D 29,64 Samual Smith"
-----------
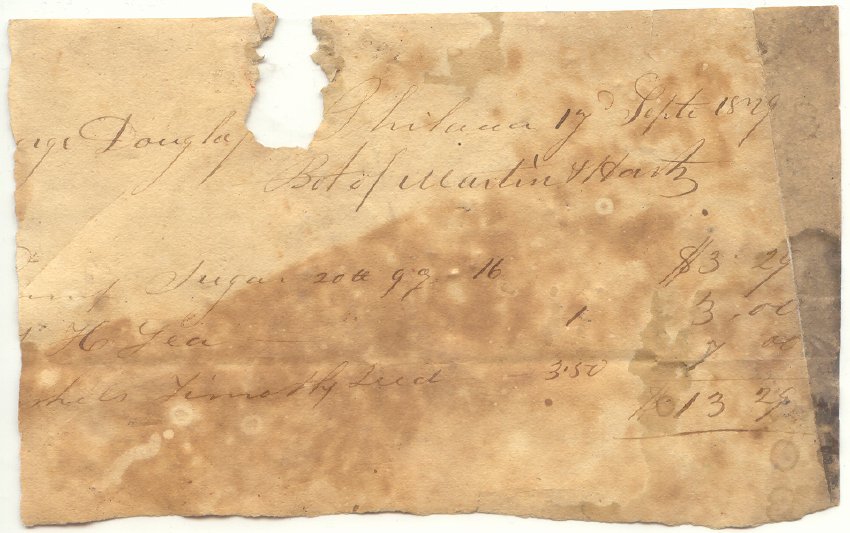
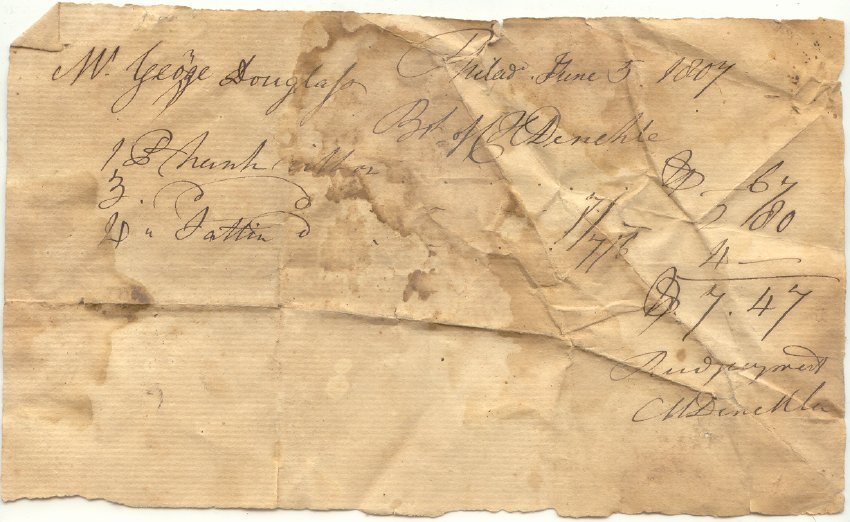
Receipt / Payment received Mr. George Douglass bot of Mr M Denekle
Location: Phildelphia Date: 3 June 1807
Philad[elphia] June 5 1807
Mr. George Douglass
Bot (bought) of Mr. M Denekle
1 (symbol means "paid"?) trunk? mirror (paid symbol) ___67
3. ( paid symbol?) 7/7/6 2 80
4. sattin (satin?) (paid symbol) 4___
(paid symbol) 7.47
Received payment
M Denekle
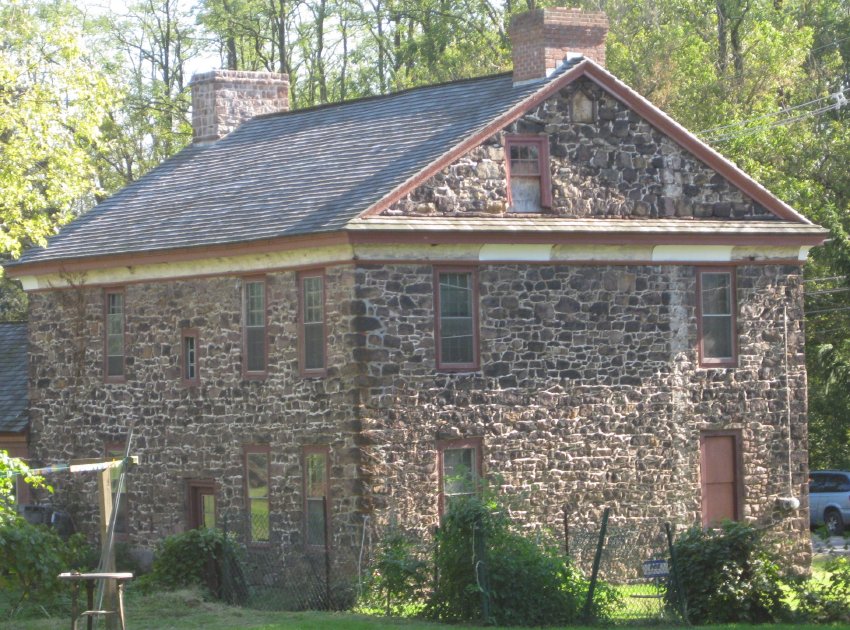
Northeast perspective view of the original 1765 house-block showing its principal features other than façade details:
NE (back) eaves wall with asymmetrical fenestration based on differences in placement of interior elements (built-in closet ["Schrank"] in recess from chimney-plane of SE chamber on 2d floor, and kitchen fireplace and doorway passage on 1st floor); rubble stone construction of the secondary walling. The principal façade [not shown in this photo] facing “Old Philadelphia Pike” is of cut and dressed ashlar sandstone.
Original plastered cove cornice; see pencil detail drawing of "Main Cornice" of Pottsgrove Mansion noting 3 ½" radial recess of plastered segment of cornice assembly from the cord between moldings above and below the arced plaster transition.
Attached photos 5883, 5884, and 5886 show 17th century plastered cove cornices in England, which were quite possibly antecedent influences for similar cornice treatments in Germantown, north of early Philadelphia, and for Pottsgrove mansion, a few miles east of the Douglass house.
Larry Ward
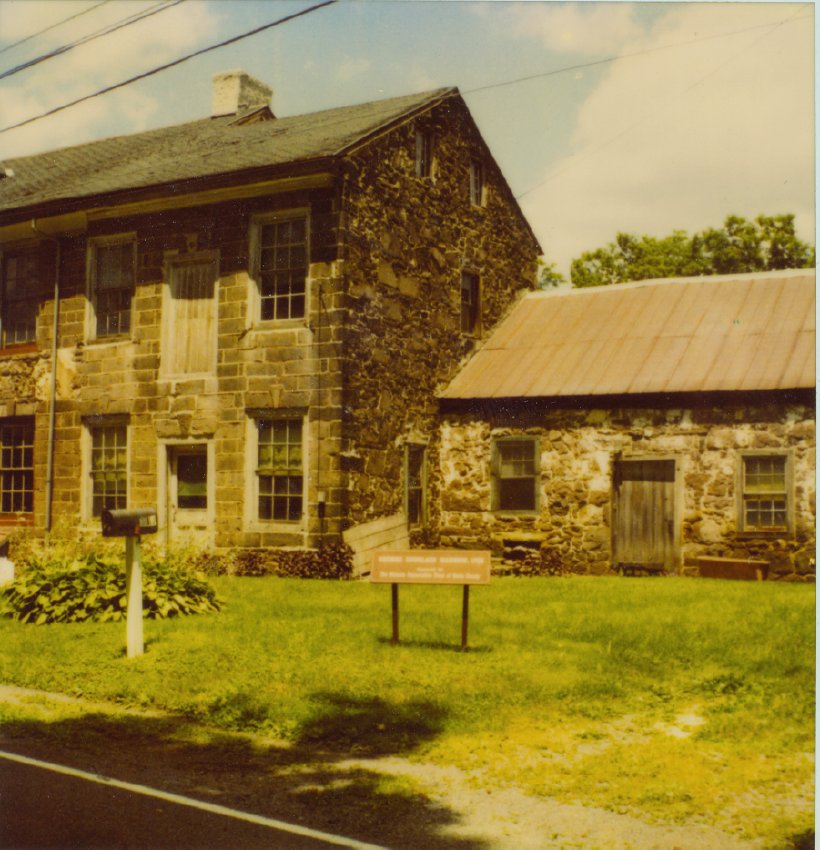
Series of 3 color photographic prints of detail views of the additions on the southeast gable end of the 1765 George Douglass House:
Image #1, Douglass House, perspective view of the 2 story Amity Store addition with freight door to 2d floor ware-house, and 1 story addition used for processing meat and other food products as part of the "general store" mercantile functions of the 4-structure complex. Store ledgers commencing in the late 1760s and owned by the Trust are kept by in archival conditions by the Berks History Center, where they may be viewed on its premises.
Image #2:The white-painted wall [removed in the early 21st century] connecting back corners of the 1765 house and the 1-story food processing structure is not original to the period. It enclosed a brick-paved yard facilitating the passage of people, food ingredients, and finished goods for sale in the store facilities in the period between the house [which included the original Amity Store in the room fronting the original kitchen from the late 1760s until the construction of the store addition c. 1798-1810], the 1-story addition, the store addition, and the stacked root cellar and smoke-house between the store addition and the 1-story structure. A late 18th century document in the Trust's collection is an inventory of "Pork in the Smoke House", reciting sales from and processed additions to the pork to be smoked for sale.
Image #3: Elevation view of the Store and 1-story additions. The chimney at the gable-end of the 1-story addition vented a very large fireplace used in connection with the processing of food for sale and for the Douglass family, and for their guests and business visitors, and probably for those employed in the various enterprises conducted by George Douglass Sr. and Jr. from 1765 to the death of George, Jr., c. 1832.
Larry Ward, August, 2023
Declaration of Covenants and related PHMC documents
The parties to these covenants are the Commonwealth of Pennsylvania, acting by and through the Pennsylvania Historical and Museum Commission, (hereinafter referred to as the Commission), and the Historic Preservation Trust of Berks County, PA (hereinafter referred to as the HPTBC.
The parties agree that, for good and valuable consideration, the receipt and sufficiency of which are hereby acknowledged, hereby declare that this instrument, entitled “Declaration of Covenants,” shall be binding as between the parties and their respective successors and assigns and shall be recorded with the Berks County Recorder of Deeds promptly after execution and acknowledgement of this Declaration with a certain deed dated [Date of previous deed], and shall be binding on the George Douglass house and lot owned by the HPTBC by reason of the 1988 Deed from Betty Webster, Grantor, dated _______, 1988 and recorded in Deed book_________, page_______, conveying said premises to the HPTBC. The HPTBC its successors and assigns, covenants and agrees to assume responsibility for the maintenance, preservation, and administration of the property in satisfactory manner for a demonstrable public benefit for a period of fifteen (15) years from [Deletion] the date of execution of this instrument.
The provisions of these covenants, hereinafter expressed as covenants running with the land, are herein set forth so as to ensure the maintenance and preservation of the architectural and historical characteristics of The George Douglass House, which has been determined eligible for listing or is listed in the National Register of Historic Places under the provision of the National Historic Preservation Act of 1966 (80 Stat. 915). Architectural and historical characteristics shall be defined as those significant physical features that qualified the property as eligible for the National Register of Historic Places.
The George Douglass House shall be maintained and preserved in accordance with the Secretary of the Interior’s Standards for the Treatment of Historic Properties. No construction, alteration, rehabilitation, remodeling, demolition, site development, ground disturbance, or other action shall be undertaken or permitted to said property without the prior written permission from the Commission. Prior to the commencement of work, the HPTBC agrees to notify, in writing, the Commission of all work on said property in its entirety that might affect the property’s architectural or historical characteristics. The Commission will be given thirty (30) days from receipt of the notice to review and approve in writing the appropriateness of said work.
For work that involves ground disturbance, the Commission may require archaeological investigation at the HPTBC‘s expense. In the event that archaeological materials are discovered during ground-disturbing activities, work shall temporarily cease, and the Commission shall be consulted for instructions prior to proceeding with the work. Any archaeological work shall be conducted in accordance with the Secretary of the Interior’s Standards and Guidelines for Archaeological Documentation (48FR 447344-37) and any such standards and guidelines as the Commission may specify.
The HPTBC shall allow the Commission, at all reasonable times and upon reasonable advance notice to the HPTBC, access to inspect said property to ensure compliance with this preservation covenant.
It is further agreed that the Commission in no way assumes any liability or obligation for maintaining, repairing or administering said property and the HPTBC shall hold the Commonwealth harmless from and indemnify the Commonwealth against any and all claims, demands and actions based upon or arising out of any activities performed by the Commonwealth, Commission, its officials, employees and agents under this covenant and shall, at the request of the Commonwealth, defend any and all actions brought against the Commonwealth based upon any such claims or demands.
Failure of the Commission to exercise any rights or remedies granted under this covenant shall not be construed to be a waiver by the Commonwealth of its rights and remedies in regard to the event of default or any succeeding event of default.
The rights and remedies of the Commonwealth provided in this covenant shall not be exclusive and are in addition to any other rights and remedies provided by law or under this covenant.
In Witness thereof, the HPTBC has hereunto set its hand and seal this _______ day of _________________, 2020.
Historic Preservation Trust of Berks County, PA
By__________________________________
Bradford Kissam, Board President
COMMONWEALTH OF PENNSYLVANIA
COUNTY OF ______________________
This record was acknowledged before me on ___________________[date] by Bradford Kissam as Board President, who represents that he (or she) is authorized to act on behalf of The Historic Preservation Trust of Berks County, PA.
Notary Public
My commission expires: ___________________
In Witness thereof, the Commission agrees to accept this Declaration of Covenants on this _____ day of ____________________, ______.
Pennsylvania Historical and Museum Commission
By___________________________________
Andrea L. MacDonald
Deputy State Historic Preservation Officer
COMMONWEALTH OF PENNSYLVANIA
COUNTY OF DAUPHIN
This record was acknowledged before me on _________________ by Andrea L. MacDonald as the Deputy State Historic Preservation Officer who represents that she is authorized to act on behalf of the Pennsylvania Historical and Museum Commission.
____________________________
Notary Public
Title of office
My commission expires: ________________
Hi, Karen,
Attached is a copy of the Declaration of Covenants signed by Brad Kissam and notarized.
The original was mailed to you this AM by Priority Mail, so it should arrive next week [unless it gets dumped in a voter-suppression ballot-bin].
Please return it for recording when executed on behalf of the PHMC.
Thanks, and have a nice weekend,
Larry
Good afternoon Larry,
I’ve reviewed the draft Declaration of Covenants. Thank you for identifying the changes so easily. It meets our expectations. Please feel free to go ahead and have it signed by the President and notarized. Once it is signed on your end, it should be mailed to my attention at the PASHPO. We do have staff working in the office and they should be able to alert me that it was received. I’ll be to alert Andrea MacDonald that her signature and subsequent notary will be required.
We will then return it to you for recording at the Berks County Courthouse.
Have a great evening and thank you again for doing this so quickly. I should have caught it earlier that it was missing.
Karen
Larry Ward
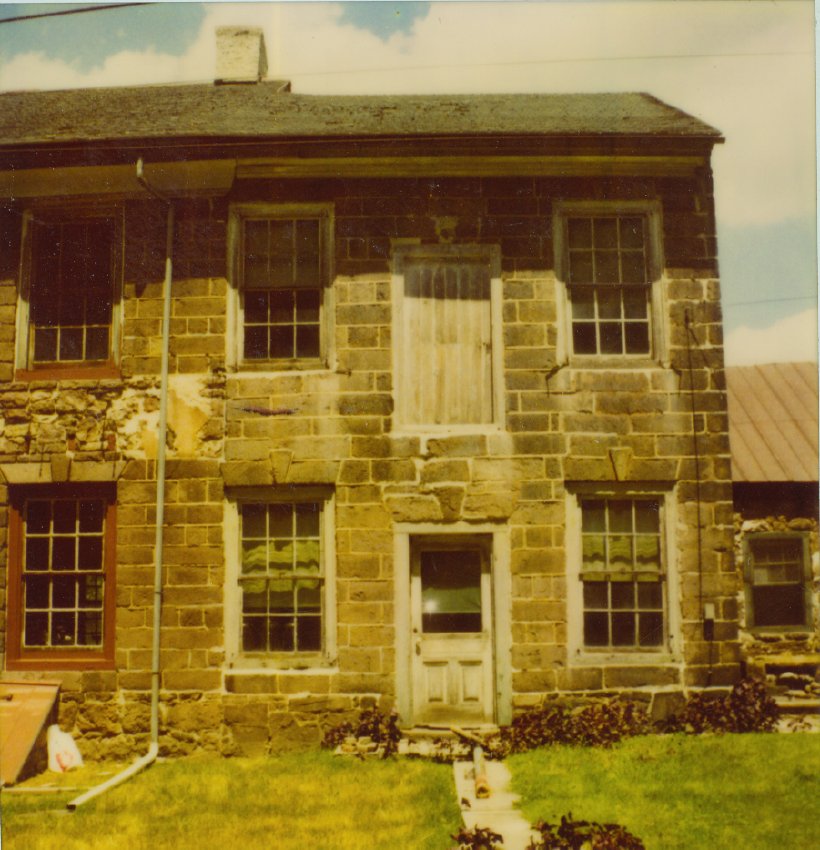
Series of 5 color photographic prints of detail views of the George Douglass House and additions.
Image #1 shows an elevation view of the c. 1798-1810 Amity Store addition to the 1765 "Manor House". The door above the entrance door is a "freight" door to the 2d floor wares storage apace for goods sold in the store below.
Images #2 & 3 are an elevation view of the façade of the 1765 house. Two of the 3 Federal-era attic dormers survive and were removed in a late 20th century restoration to the original 1765 period of the house. The frontispiece of one of them [photo attached] is a permanent artifact exhibited in a chamber on the 2d floor, a fine example of the intricate pieced craftsmanship of early carpenters and joiners in the Manatawany "backcountry".
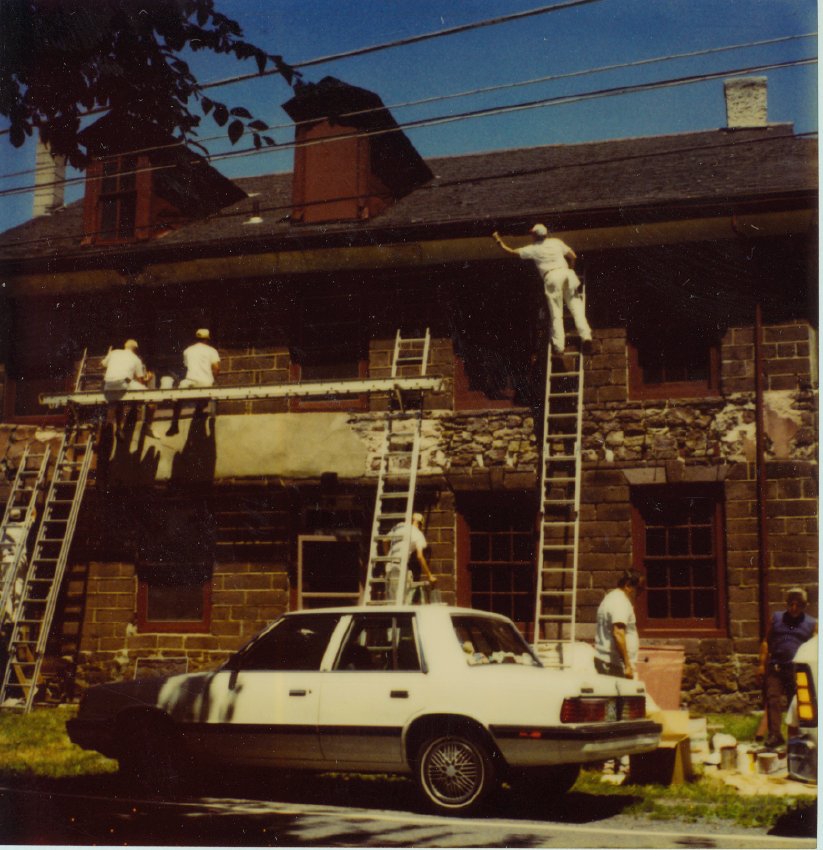
The partly rubble and partly stuccoed masonry range between the first and second story windows was the unseen backwall of the ceiled pent roof from 1765 until late in the 19th century, when it was removed. Photo # 109, Oct 24, 2021, shows the re-constructed "pent" as restored in the 2017-2021 campaign funded in part by a Pennsylvania Historic and Museum Commission matching grant.
The doorway in the leftmost bay was installed in the late 19th century for access to a barber shop, an ice cream parlor, and retail sale of goods, including "oysters". It was restored in the late 20th century to its original site for a window, one of the symmetrical fenestration elements of the original Georgian façade. The attached early 20th century photo of the Douglass House and its additions, published in one of George Meiser's Passing Scene volumes shows signs advertising "Oysters" above the doorway, ice cream, on a sign suspended under the pedimented hood, and haircuts, by the radially striped barber pole next to the left hood-post, and now in the Trust's possession as an artifact to be exhibited
in the "Shelley-Pendleton Education and Exhibit Center" dedicated within the Douglass House in November, 2022.
Images 4 & 5 show the original 1765 house and the left bays of the Amity Story addition, and the sloped doors of the steps descending through the basement into the cellar under the original Amity Store in the 1765 house-block.
Larry Ward, August, 2023
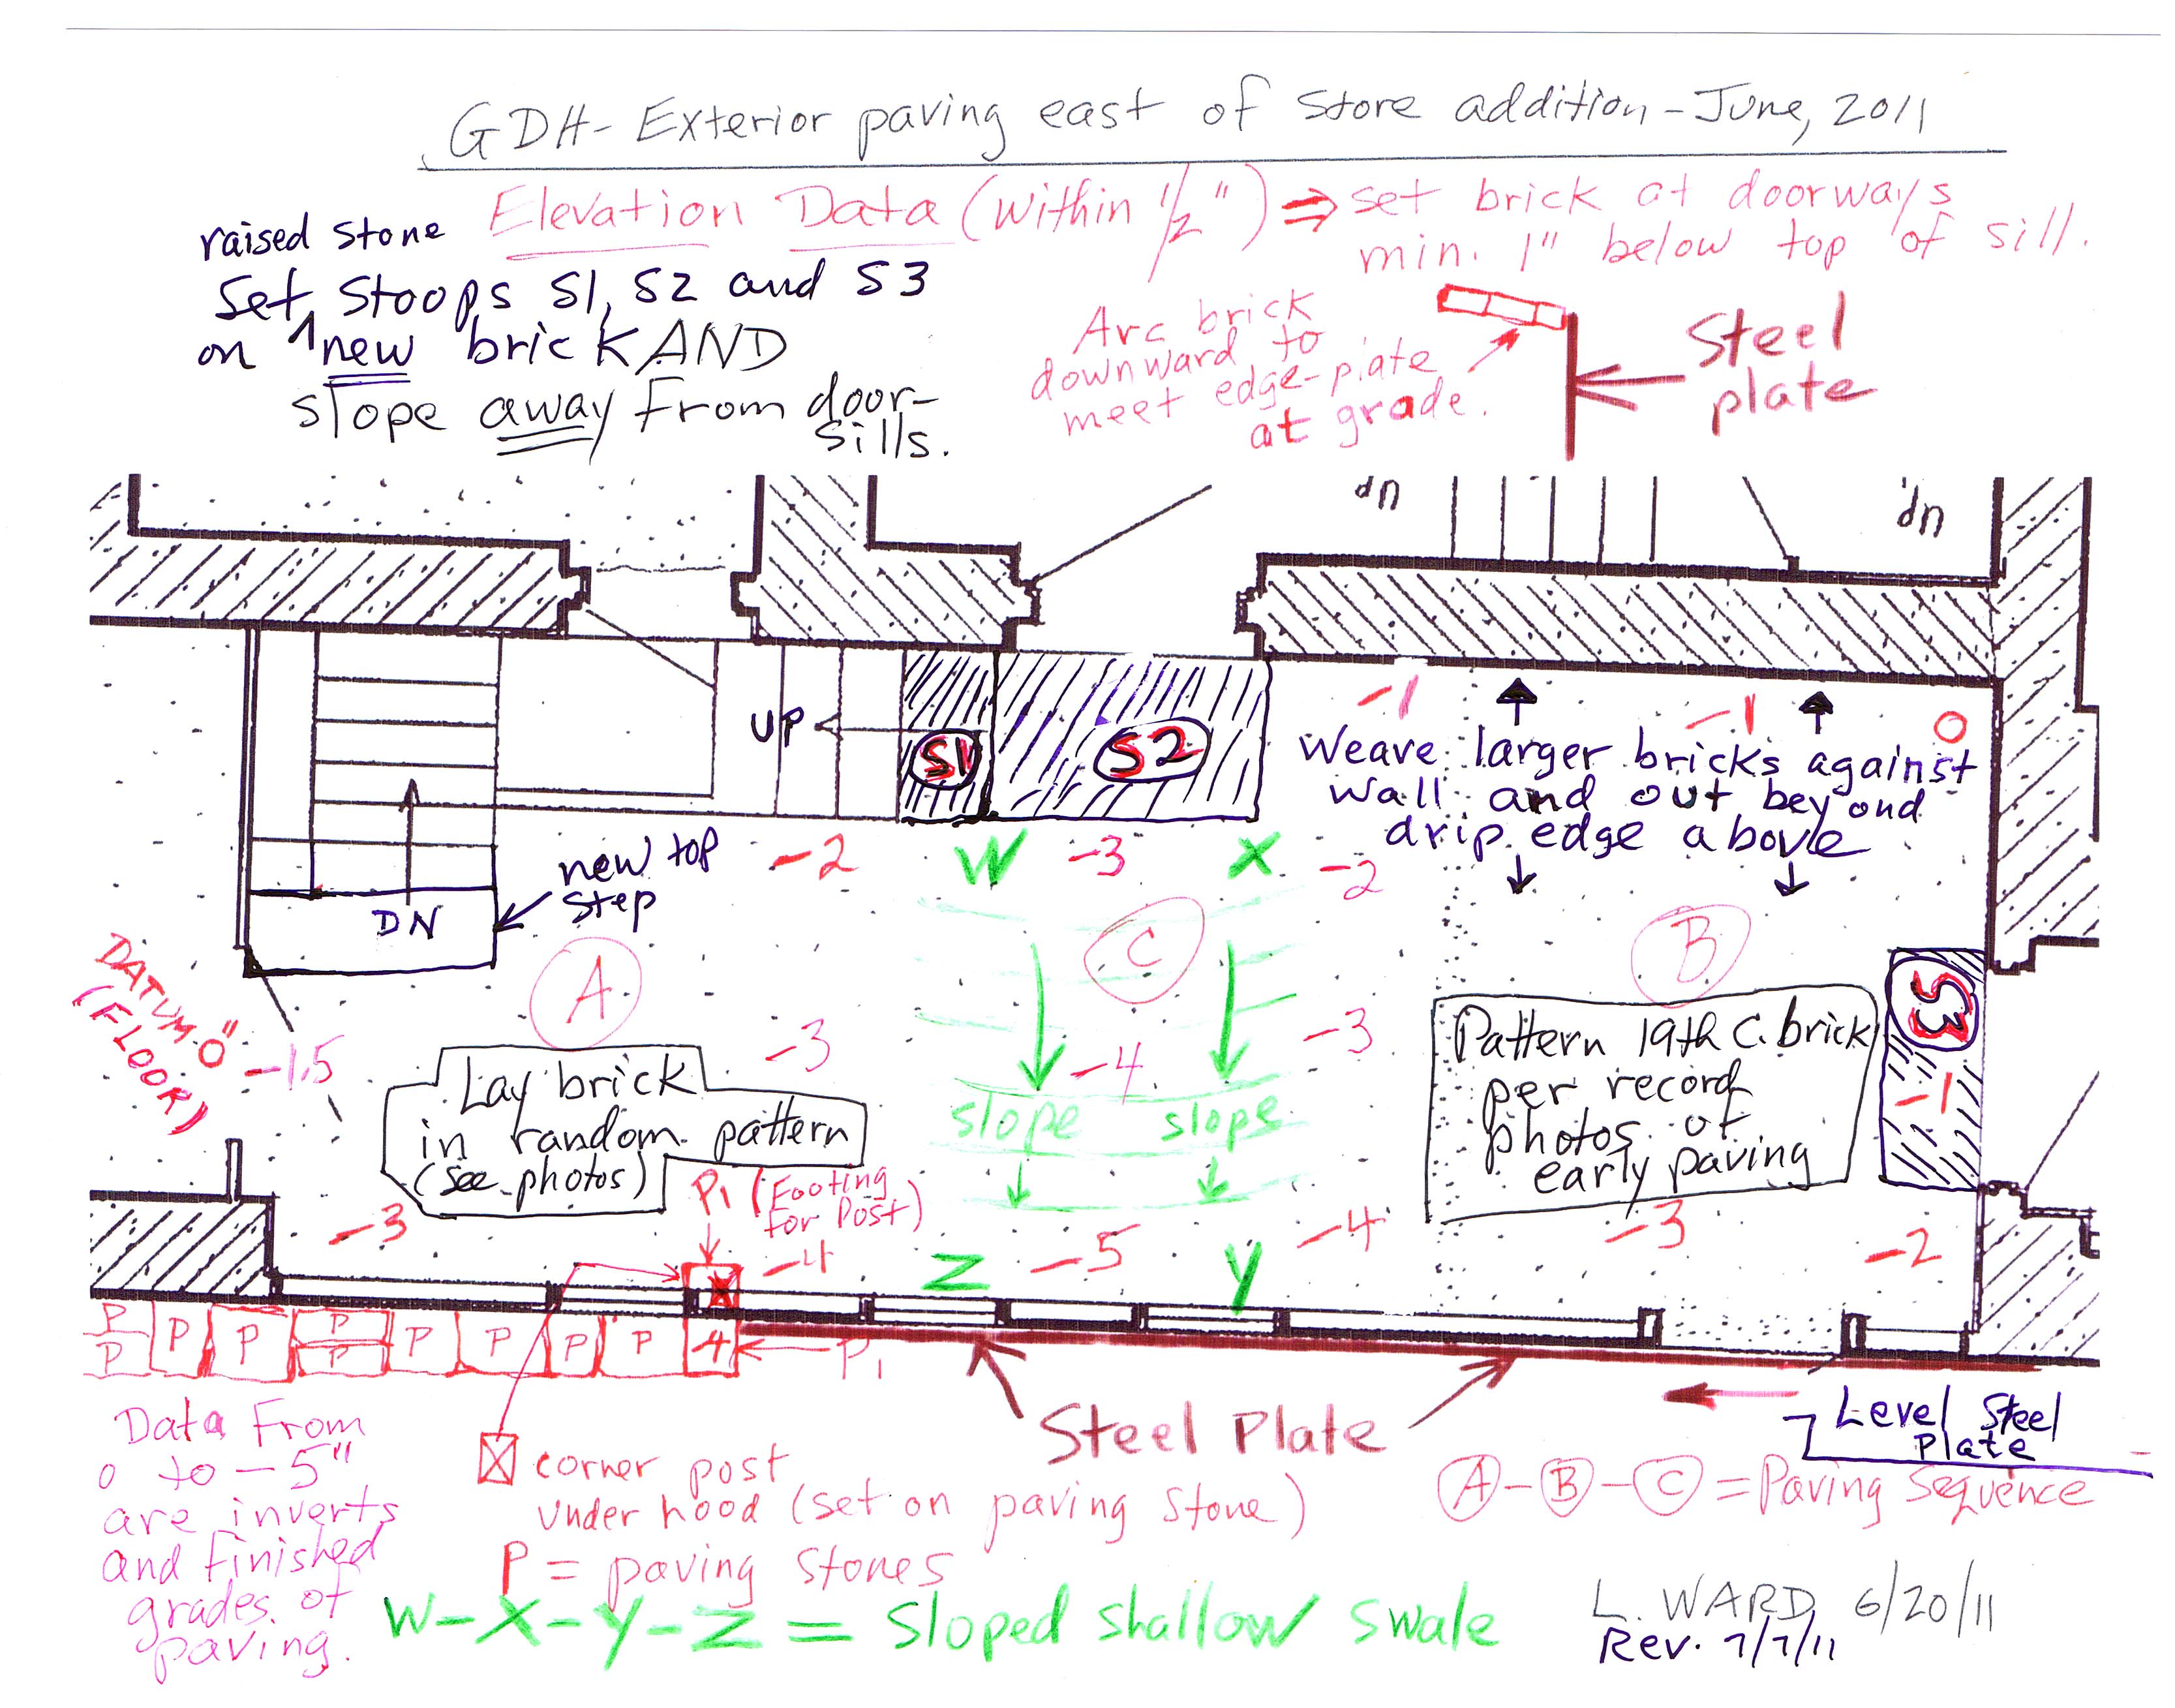
Electronic copy of a field notes drawing (and 12 digital photographs) providing the data for grading and repaving the store yard area behind the c.1800 store addition to the 1763 George Douglass house.
The drawing provides the relative grade objectives for the restored brick paving on the open quadrangle bounded by the 1765 George Douglass house, the c.1800 store addition, and the c.1830 ancillary addition. The negative numbers in red denote the "inverts" [in inches] of selected final grade elevations below the benchmark level ["datum"]. In this case the selected datum is the existing 20th-century concrete floor level of the c.1830-1840 structure. The grades shown are calibrated to conduct surface flow across the restored brick paving and away from the doorways, steps, and masonry walls of the buildings, directing the flows to the north-south drainage course ["swale"] east of the steel plate retaining the edge-bricks along the margin of the store yard.
The two-level{1} concrete paving [removed], which consisted of approximately five tons of heavily aggregated 20th-century concrete, is shown in photo #3871 (6/7/11).
Photos #3939, #3942 & #3949 (6/10/11) show the brick paving found beneath the southern portion of the concrete slab adjacent to the stone steps to the root cellar and the stair-block to the smoke chamber[n].
[n] The existing smoke chamber is located above the vaulted vegetable cellar between the store addition and the ancillary addition to the south. This two-story smoke chamber/root cellar block appears to be structurally integral with the ancillary addition, forming an ell joined to the south gable wall of the store addition. Inside the front board of the 1803 Day Book for the Douglass-[William] Jenkins store [see archive record HPTOBJ1--1008.01.022], there are ink manuscript entries listing the varying quantity of pork in the “smoke house.” It is not known whether this reference is to the extant smoke “chamber” or to another structure on the site by 1803, possibly surviving as the free-standing partial ruins to the east of the 1765 Douglass mansion.
If the window in the south gable wall of the store addition was closed off when the present smoke chamber structure was built [possibly as late as c.1840], then the c.1800 store addition pre-existed the smoke chamber, making it highly unlikely that the smoke chamber/root cellar element existed in 1803. Thus the “smoke house” recorded in the 1803 Day-Book would not have been the present smoke chamber.
Photo #4010 (6/17/11) shows the surviving brick paving against the rear [eastern] wall of the c.1800 store addition to the 1765 house. These remnants included a few whole bricks, but the majority of the paved area, probably installed in the mid-19th century and possibly contemporaneous with the construction of the ancillary addition, consisted of broken bricks ["halfs" and "brickbats," or "bats"]. The brick re-paving was laid in a random pattern based on these surviving remnants.
Photograph #5734 shows the re-paved southern section of the yard, the stone pavers under the drip-edge of the roof-extension hood, and the interior corner area graded to shed surface runoff away from the building walls (upper right corner of photo)].
#5811 shows brick paving in progress, with boards functioning as straight-edges set to establish correct slopes along all axes{2}. Bricks will be woven-in between the completed segments to establish the grade objectives. The gray stone screenings and white sand-cement mix will "key" into the joints between bricks when subjected to moisture, thus forming a stable bed for the paving. #5938 is a detail view of laid bricks, stone screenings, and the soil between the leveling boards ["straight edges"] tamped and prepared for the sand-cement setting material.
Prior to grading the area to be paved with 19th-century bricks of varying dimensions (found on-site and in other areas of Molatten Village), a 3-inch-thick tread-stone was inserted beneath the top landing of the steps to the food-storage cellar below the smoke chamber. This was necessary to raise the grade of the top landing stone to the level of the concrete floor [the 0-datum benchmark] of the 1840 addition, to ensure positive pitch away from the buildings and produce the incremental grade changes ["pitch"] to achieve the final relative elevation objectives specified in the drawing(a).
(a)The inverts on the drawing were adjusted "in the field" to achieve the required slopes on all axes [photo #6164 shows the completed brick paving, the stone pavers under all drip-edges, and the roughly graded north-south earthen swale parallel to the steel-plated edging of the brick-work; #6021 is a detail view of the brick paving].
The larger paving bricks laid along the eaves walls, under the eaves drip-edge two stories above, will serve as a deflector and conductor for roof runoff. The joints directly under the drip-edge, which are subject to washout of the sand between bricks, will be grouted with a mortar (without cement) using the same coarse brown sand(b) as constituted the dry-grout swept into the joints in other segments of the brick-paved store yard, adding a lime binder to inhibit washout.
(b) Home Depot "All-Purpose" bagged sand.
Stone stoops, found elsewhere on-site, were set at the doorways to the 1765 kitchen and the c.1800 store addition, and at the red sandstone stair-block to the smoke chamber above the "root-cellar" in the later addition [photos ##6025 and 6158].
FOOTNOTES
{1} The two grade levels of the continuous concrete slab were joined by a 7-inch riser.
{2} North-south, east-west, radial, and diagonal.
Larry Ward
The Historic Preservation Trust of Berks County, PA., Project ME Number 16709
George Douglass House Project work Accomplished January 1, 2019 to March 31, 2019
During the 1st quarter of 2019, our project plasterer (working on his 20th National Register structure) made substantial progress in the interior work, restoring wall integrity in the 2d floor chambers and hallway.
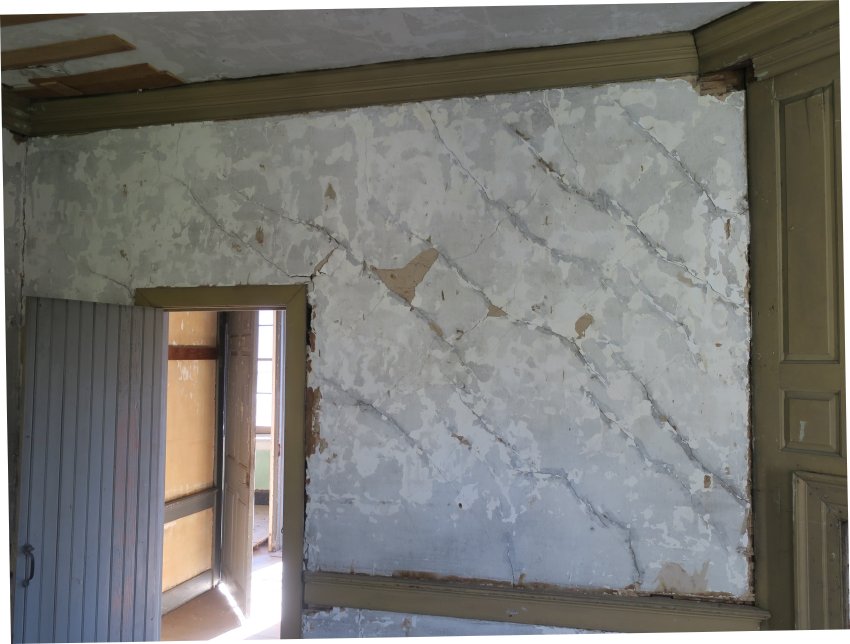
This work continued during this quarter with the sensitive removal of later coatings and accretions of lime wash, paint, wallpaper adhesive, coal-soot, and soiling from original finish plaster that was sufficiently stable and well-anchored on the masonry wall substrate [photo #25, 2/15/19]. The original lime-plaster, exposed by this process for the first time in over two centuries, appears to express a soft off-white or light ivory/grey tint, possibly from a small component of local clay, which is a light amber-brown. Under consideration is the application of similarly tinted lime wash to the new plaster finish on walls in the same chamber in order to conform all surfaces to original tonal qualities of surviving intact plaster as much as possible, and to preserve and exhibit historically authentic original surfaces in proximity to new plasterwork.
Unstable, de-laminated, and deflected plaster was restored to the proper ceiling-plane with recessed washers where necessary, and missing plaster was infilled with lime plaster base ["scratch"] and finish coatings. Paint and other accretions were scraped off early plaster surfaces, which were then washed with clear water and air-dried with the aid of shop heaters that also provided effective curing temperatures. Fractures were bridged with base and finish coatings after taping. The large area of missing plaster [photo#52, 11/9/18] in the NW chamber ceiling was re-plastered with a brown-coat lime plaster mix [photo # 6, 3/14/19] , and a thin finish coat applied after the base coat had adequately set-up.
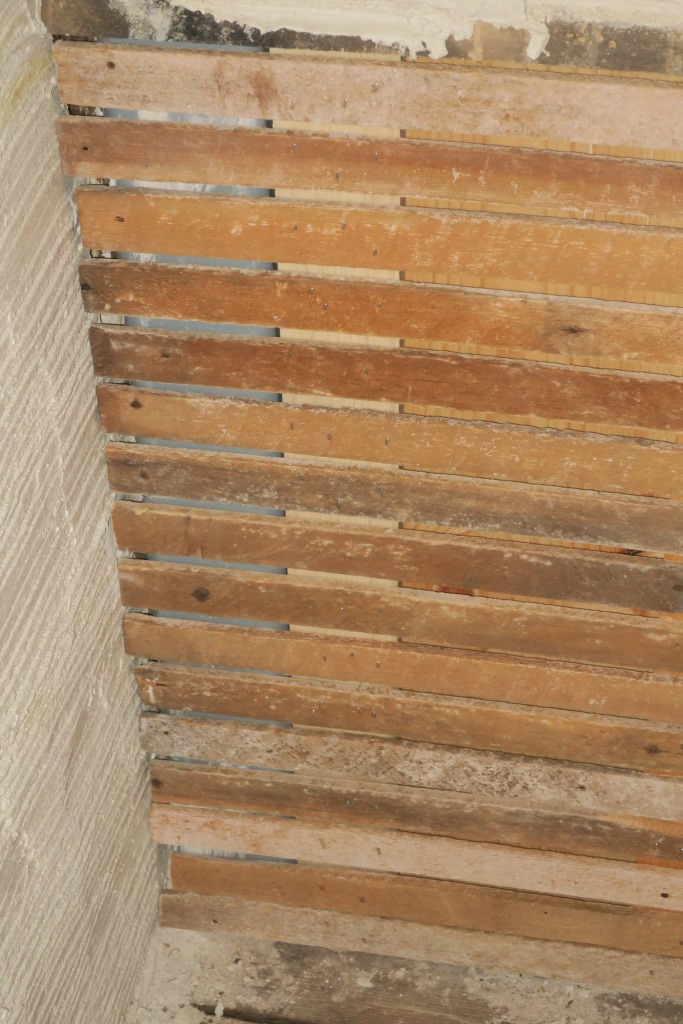
Platform-scaffolding was erected in each room as work progressed [photo# 21, 4/6/19], and the room temperature consistently maintained above 50 degrees F. during the curing ["setting up"] period for applications of plaster. Defective or missing lath was replaced or stabilized in-place. Historically authentic lime plaster was employed for the base and finish coatings, reinforced with animal hair as found in the original 1765 plaster composition. Each chamber was warmed to 50 degrees+ throughout the curing period for new plaster. Later coatings of paint, wallpaper glue, and fossil-fuel accretions have been removed from several hundred square feet of stable and intact original plasterwork on chamber walls. These wall ranges, fine specimens of pre-Revolutionary War American vernacular craftsmanship, will be preserved as a permanent in-situ exhibit demonstrating undisturbed architectural fabric and un-coated original plaster surface. A segment of original early lath will remain exposed behind Plexiglas in the NW back-chamber as an exhibit of authentic 1765 hand-hewn lath and hand-wrought "rose-head" nail fasteners.
A doorway between the two northern chambers was determined to be not original to the pre-Revolution period and was closed up with planking and lath [photo # 62, 11/9/18] and plastered over. Chair railing conforming to the surviving 1765 profile was applied across the former doorway opening [photo #25, 4/6/19]. "Blind" partitions, lacking passage doorways and providing privacy and separation of domestic from mercantile functions in adjacent spaces, were installed between the two northern chambers on the 2d floor, and between the kitchen and southwestern front ("store") room on the first floor [photo # 33, 4/6/19, showing planking ready for lath].
By the end of March, 2019, plaster restoration on the 2d floor of the George Douglass House, both in terms of preservation of original plaster and stabilizing and re-coating compromised segments, had progressed through the majority of plaster walling in the chambers. In addition, 3 of the 4 ceilings had been stabilized, leveled, and re-plastered. All stable original plaster wall segments on 2d floor were restored by removal of non-period coatings and preserving un-compromised plaster on original lath in acceptably uniform plane.
Larry Ward, April 2019
The attached photos show the Project signage noting the grant participation of the Pennsylvania Historic and Museum Commission; “before” photos showing the degraded plaster to be preserved un-coated, removed and re-plastered, or whitewashed after crack repairs and surface losses; and (in Photo #3) the out-of-level, degraded, and missing flooring to be preserved, restored, or replaced in the “best” parlor.
Series of 4 digital images depicting the early joint and pointing
mortar at the George Douglass House.
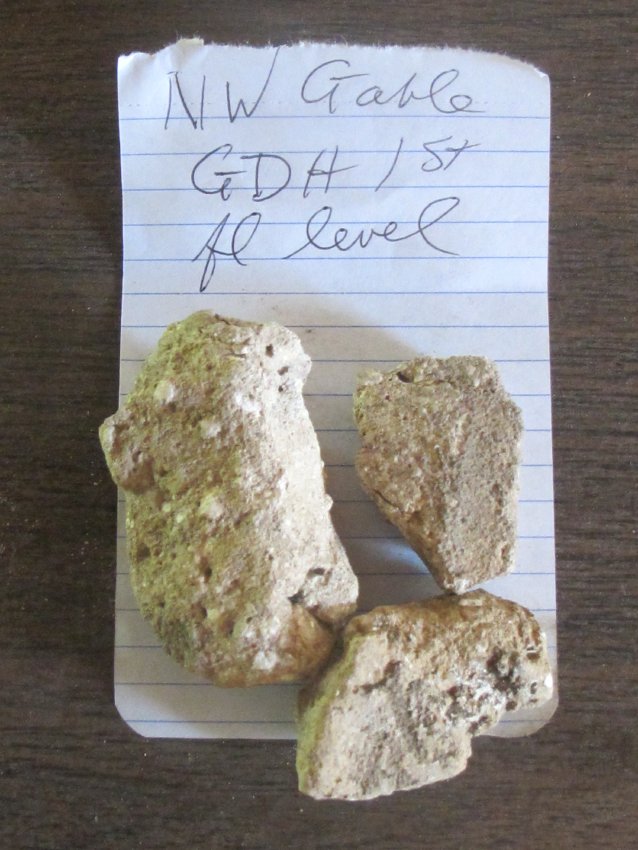
These samples will be tested for relative color and aggregate [sand]
and lime content to provide an authentic basis for the mortar used
in re-pointing and in the restoration plaster.
DETAILED CAPTIONS
#3048: 1 st floor mortar masonry sample.
#3049: mortar samples from 1765 SW gable wall [in store attic].
#3050: Bottom of store attic stair from 1765 gable-end wall.
#3051: Plaster sample from SW gable of 1765 house, plastered c,
1798-1810 when store addition was constructed.
Larry Ward, Oct, 2022
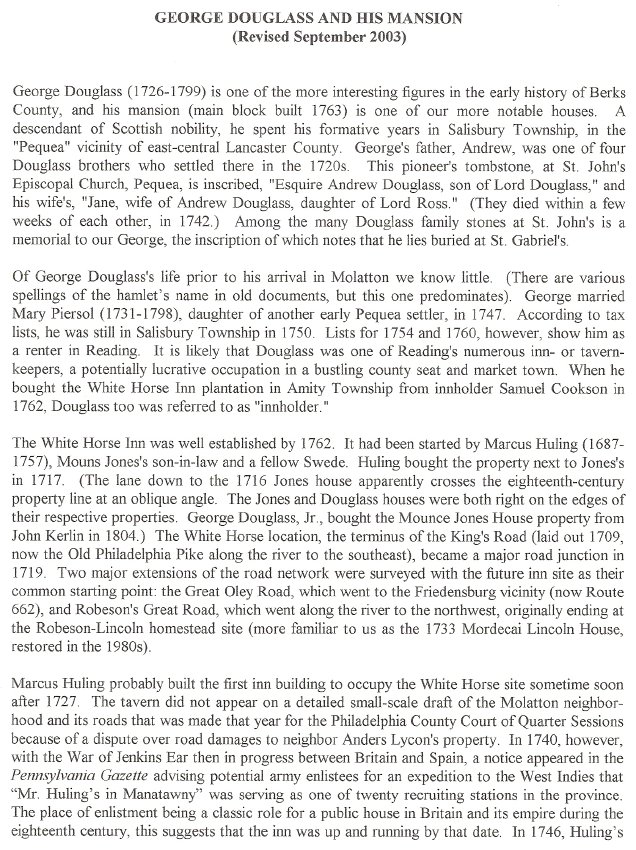
A six-page type-written history of George Douglass and his business influence in the area of current day Douglassville, PA, as well as a description of his political and business success. Text also contains various descriptions of elements of the George Douglass House, including the full-perimeter [“encircling”] plastered cove cornice, a refinement emanating from late 17th century “Baroque” English influences. This form of eaves transition appeared in Philadelphia in the very early 18th century, and within the next half-century migrated to Germantown, Chester and Montgomery counties, and eventually arose on more remote Germanic houses such as the Keim house in Berks County [see Archive record KHPH9 and the accompanying images and Footnotes].
See additional images for full text.
Larry Ward
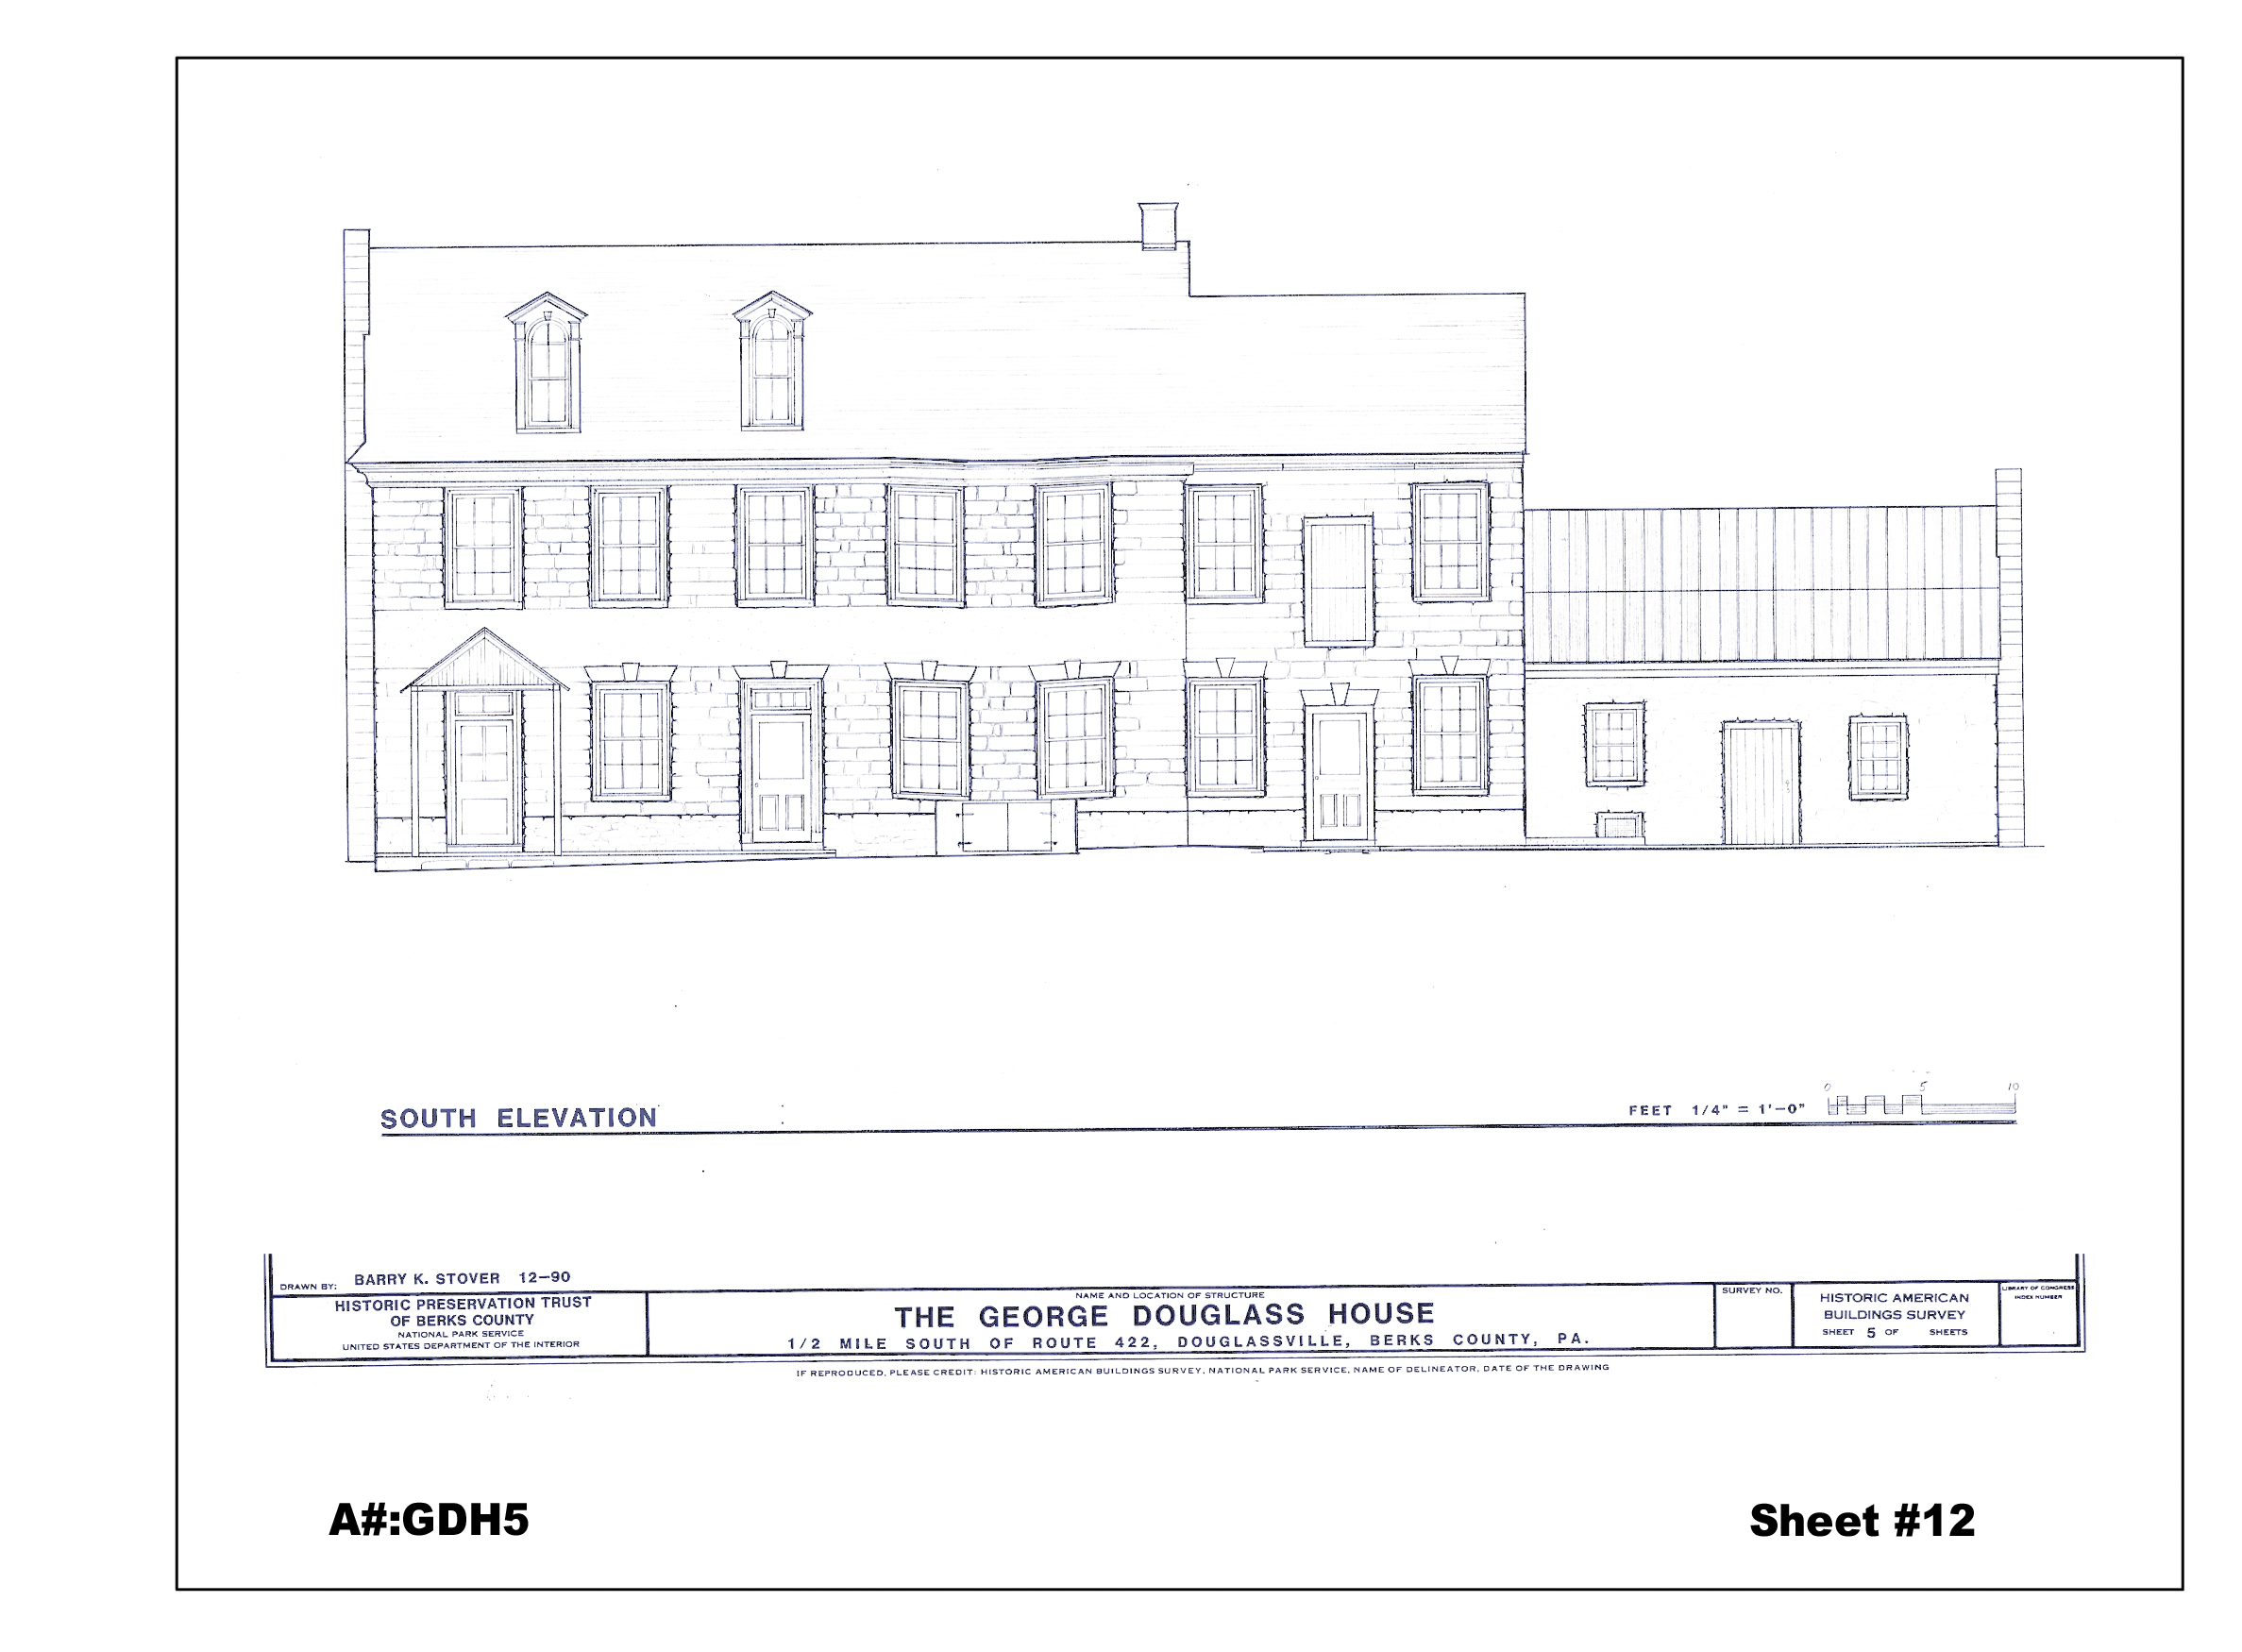
Architectural Drawing of the South Elevation of the George Douglass House, with two additions, after partial restoration.
Included as drawing A#GDH5, sheet #12 in the 2008 Atlas of Architectural Drawings published by the Historic Preservation Trust of Berks County, PA.
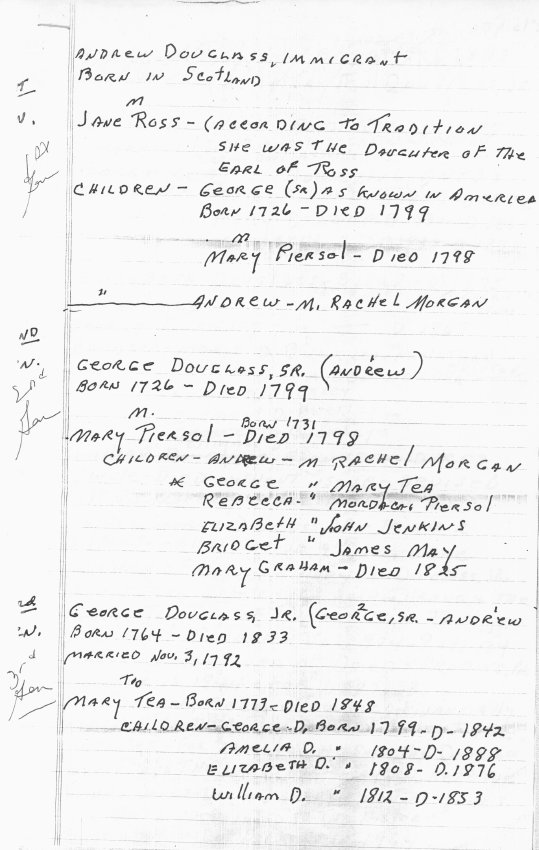
A two-page handwritten genealogy of George Douglass, beginning with George's father, Andrew and including four generations in total. A paragraph following the information on fourth generation includes brief deed information for White Horse Tavern, George Douglass House, and Mouns Jones House.
See additional image for full text.
Historic Paint Finishes Study:
The George Douglass House
The original finishes of the First Floor Hall and Staircase
Conducted at the Request of
Mr. Laurence Ward, Preservation Project Coordinator
425 Museum Road
West Reading, Pennsylvania 19611
By:
Matthew J. Mosca
Historic Paint Finishes Specialist
Artifex, Ltd.
2641 North Charles Street
Baltimore, Maryland 21218
Date: 15 May 2012
Table of Contents
Introduction 3
Technical Program 4
Note regarding the printed photomicrographs 5
Locations of the Paint Samples 6
Examination of the Samples: photomicrographs 10
The First Finish: finishes of ca. 1765 29
View of the Continuous painted baseboard on the Staircase 33
The Continuous painted baseboard 36
The Second Finish Period 37
Exposure of Graining 38
The Second Finish Period (probably late 18th century) 40
Restoration painting: over-painting the second finish (Suggested system of painting to restore the first finish) 43
Recommended gloss level 43
Clear glazing 43
Color Standards: CIE Lab coordinates, Hunter Lab 44
Color Standards 46
Addendum: Second finish period graining
Addendum: Note on the plaster: Suggested lime whitewash
Introduction
Samples were collected from the Hall (or Center Passage) of the George Douglass House, dating to ca. 1765. While the Douglass House has suffered some changes and damage over time, the remaining woodwork is outstanding, illustrating the boldness of the mid-eighteenth century finish carpentry. Most of the Hall is intact.
The dado shows, in part, a curious layout of finishes: note the illustration below, of the staircase dado, with a graining finish on the panels, but also on the stiles, connecting the panels. This is part of the second finish period, which may date to the end of the eighteenth century.
Stair Landing:
The varnish coating on the "graining" has been recoated (late nineteenth century, or early twentieth century?) which was not well executed. The painted surfaces of the dado have been repainted repeatedly.
The original finish, dating to the period of construction, is exceptionally compelling and instructive. The issue of showing some of the second finish, with its interesting graining will be a point of interpretation and decisions.
Technical Program
Note: The following is the procedure that is generally followed for museum quality paint finish examination. The identification of the pigment components is among the most important parts of the process.
1. Collection of Materials
Samples were taken from the subject areas to determine the first and second finishes used on the woodwork of the specific sites. Two types of samples were sought: for stratigraphy (dating) purposes, and agglomerations of paints (drips) to aid in color and pigment identification.
2. Exposure of Finishes:
Exposure of the early finishes proved to be very informative, particularly for the grained surfaces that date to the second finish period. The exposures were photographed and are shown in this study.
3. Stereoscopic and Polarized-light Microscopy, and Microchemistry
All samples are examined in cross section and obliquely. When required, the sample may be mounted for thin cutting or polishing. These samples are mounted in Bio-plastic polymer resin, in most cases. The samples are ground and polished for examination using top lighting. Each significant layer of a sample was identified by comparison, for this study, to the Munsell Color System and Benjamin Moore Color Systems, comprising in total of over 7000 color standards, however, the color standards for this study were prepared in the laboratory specifically to match each noted finish.
Exposure to full-spectrum or part-spectrum light is used to help reduce the yellowing of oil media. In this case, the original finish showed very advanced deterioration due to a number of factors. Initial stereomicroscopy is accomplished using an Olympus SZ-1145 microscope. Polarized-light microscopy, when necessary, is also undertaken, using the Olympus BMAX-50 microscope. Polarized-light microscopy identifies pigments and media according to the McCrone Research Institute system of particle identification.
4. Photomicrographs:
A very important means of recording chromochronological data is photomicrography: print photographs taken through the Olympus BMAX-50 microscope of particularly informative samples. This allows for clear indications of the conditions seen under the microscope, and how the recommendations were achieved. The report includes photomicrographs that are annotated with information in the report.
5. Report:
The report brings together all the aforementioned material in a comprehensible manner and includes color samples, photomicrographs, reconstructed finishes and any additional pertinent information, such as that from known documents. Spectrophotometric readings of color standards are also executed to render all standards into the CIE Lab and Munsell System of Color Notation and included in the report. In addition, suggestions for the restoration painting are included.
6. Additional examination
Other procedures such as Scanning electron microscopy, Gas-chromatography, Fluorescent microscopy and FT-IR. (Fourier Transform Infrared Microspectroscopy for media examination) may be warranted at a subsequent stage in the examination of the finishes. Before any of these additional means of examination are undertaken, the process will be discussed with the client to determine if the additional cost is warranted.
The report has provided the required information for the restoration. It is anticipated that the second floor hall will be examined at some time in the future.
Respectfully submitted this date: 16 May 2012
Matthew John Mosca
Historic Paint Finishes Specialist
Artifex, Ltd.
Note Regarding the printed photomicrographs
Despite the advances in digital technology, the printed photomicrographs may not show colors accurately. Inevitably, there are color shifts with color photographs in the printing stage. The photomicrographs are excellent indications of the paint layers and other data, but the color standards provided are the accurate indication of the original paint finishes.
Sample Locations:
1. Crown molding
2. Door Frame
3. Door, Hall Side
Samples from the Dado:
Schematic Drawing:
Additional Sample:
Location 7: Dado Stile, between the panels
Location of Samples: Dado
Samples from the Staircase Dado (Taken at the landing)
Samples From the Stair case structure
Other samples from the staircase construction
8. Stair bracket, (bottom)
9. Newel (lower part, painted black)
10. Newel
13. Handrail, lower part
Examination of the Samples:
Sample 1: Crown Molding
Photomicrograph: Mounted sample, Olympus BMAX-50 polarized light microscope/ 3x objective, with Nikon D70 digital camera body Lexar Media 1GB flash card Dolan Jenner Fiber optics illuminator, daylight filtering
Note: The sample has been mounted in polymer resin, cut and polished to 8000-micron grit polishing cloth for additional examination. The wood substrate is clearly seen at the base of the sample. The first finish (1) is a combination of yellow ochre and lead white, and this is the best surviving example of this original finish. There is a thin clear coating, a natural resin varnish layer (A). The second finish appears to be made of two paint layers: lead white with prussian blue (2a, 2b). This finish is considerably deteriorated and the prussian blue layer shows fading. There is a third finish (3) a yellowish white. The later finishes are also visible.
Sample 1: Crown Molding, Detail
Photomicrograph: Mounted sample, Olympus BMAX-50 polarized light microscope/ 10x objective, (100x total microscopic magnification) with Nikon D70 digital camera body Lexar Media 1GB flash card Dolan Jenner Fiber optics illuminator, daylight filtering
Note: The sample has been mounted in polymer resin, cut and polished to 8000-micron grit polishing cloth for additional examination. The wood substrate is clearly seen at the base of the sample. The first finish (1) is a combination of yellow ochre and lead white, and this is the best surviving example of this original finish. There is a thin clear coating, a natural resin varnish layer (A). The second finish appears to be made of two paint layers: lead white with prussian blue (2a, 2b). Note the presence of prussian blue pigment particles (B) of various sizes. This finish is considerably deteriorated and the prussian blue layer shows fading. There is a third finish (3a, 3b) a yellowish white. Some of the later finishes are also visible.
Sample 2: Door Frame
Photomicrograph: Mounted sample, Olympus BMAX-50 polarized light microscope/ 3x objective, (30x total microscopic magnification) with Nikon D70 digital camera body Lexar Media 1GB flash card Dolan Jenner Fiber optics illuminator, daylight filtering
Note: The sample has been mounted in polymer resin, cut and polished to 8000-micron grit polishing cloth for additional examination. The wood substrate is not present; the sample has delaminated from the substrate. The first finish (1) is a combination of yellow ochre and lead white, and this is one of the best surviving example of this original finish. There are two layers of the light yellow ochre (1a, 1b). There is a thin clear coating, a natural resin varnish layer (A). This sample shows two finishes of the prussian blue: layer 2 is a combination of lead white and prussian blue, with a thin clear coating (B). This finish of lead white and prussian blue is repeated (3,4). There is a sequence of yellowish white finishes (5, 6). The later finishes are also present.
Sample 2: Door Frame
Photomicrograph: Mounted sample, Olympus BMAX-50 polarized light microscope/ 10x objective, (100x total microscopic magnification) with Nikon D70 digital camera body Lexar Media 1GB flash card Dolan Jenner Fiber optics illuminator, daylight filtering
Note: The sample has been mounted in polymer resin, cut and polished to 8000-micron grit polishing cloth for additional examination. The wood substrate is not present; the sample has delaminated from the substrate. The first finish (1a, 1b) is a combination of yellow ochre and lead white. The surface has a thin clear coating glaze. Note the two separate finishes of light prussian blue color (2, 3) and the oily coating finish layer (B) that is on the surface of layer 2. This sample retains some of the original character of the paint. Layer 4 appears to be a thin oily finish, made with the same prussian blue coating, but more discolored due to the higher oil content.
Sample 3: Door (Hall side)
Photomicrograph: Mounted sample, Olympus BMAX-50 polarized light microscope/ 10x objective, (100x total microscopic magnification) with Nikon D70 digital camera body Lexar Media 1GB flash card Dolan Jenner Fiber optics illuminator, daylight filtering
Note: The sample has been mounted in polymer resin, cut and polished to 8000-micron grit polishing cloth for additional examination. The wood substrate is clearly seen at the base of the sample (note the cell structure seen in cross section). The first finish, the light yellow ochre color (1) is clearly seen, as is the clear coating (A). The second finish is the graining finish, which is comprised of a yellow ochre ground (2), the red ochre grain layer (3) and the clear varnish coating (4). A later grayish blue layer (5) appears to have been made with artificial ultramarine blue, which was not produced until 1826 (in France).
Sample 4: Dado, Cap (Dado Location 1)
Photomicrograph: Mounted sample, Olympus BMAX-50 polarized light microscope/ 10x objective, (100x total microscopic magnification) with Nikon D70 digital camera body Lexar Media 1GB flash card Dolan Jenner Fiber optics illuminator, daylight filtering
Note: The sample has been mounted in polymer resin, cut and polished to 8000-micron grit polishing cloth for additional examination. The wood substrate is not present: the sample has delaminated from the substrate. This is an odd sample, in that it is not consistent with the other samples in that there is evidence of an earlier paint (A) a light pinkish color that is trapped below a thin layer of resin varnish. This has to be considered an aberration as it is not seen on other samples and in this sample the first finish seen on the other samples follows it! The light yellow first layer (1) is followed by the red ochre (2). There is a very thin clear resin varnish layer is seen on the surface (A). There are two applications of the prussian blue color, both of which appear faded. Later white finishes are also visible.
Sample 5: Dado Panel (Dado Location 5)
Photomicrograph: Mounted sample, Olympus BMAX-50 polarized light microscope/ 10x objective, (100x total microscopic magnification) with Nikon D70 digital camera body Lexar Media 1GB flash card Dolan Jenner Fiber optics illuminator, daylight filtering
Note: The sample has been mounted in polymer resin, cut and polished to 8000-micron grit polishing cloth for additional examination. The wood substrate is clearly seen at the base of the sample. This sample illustrates the typical paint layering: the first finish is comprised of two applications of paint (1a, 1b). There is a thin clear natural resin coating (A) and surface particulate (B). The second finish is composed of a yellow ochre ground coat (2), which is the undercoating for the red ochre (3) and (4) a brownish clear coating. Note the cracks in the paint sequence filled with the subsequent paint (C).
Illustration: The present layout of finishes on the staircase dado, at the landing as seen in April 2012. This unusual painting pattern dates to the second finish period, probably from the early nineteenth century.
Note; The stiles between the panels were painted to suggest red graining, connecting the panels, creating this striped condition. This may be a unique example.
Sample 6: Dado, Stile, (Dado Location 7)
Photomicrograph: Mounted sample, Olympus BMAX-50 polarized light microscope/ 10x objective, (100x total microscopic magnification) with Nikon D70 digital camera body Lexar Media 1GB flash card Dolan Jenner Fiber optics illuminator, daylight filtering
Note: The sample has been mounted in polymer resin, cut and polished to 8000-micron grit polishing cloth for additional examination. The wood substrate is clearly present (note the fibers). The first finish is the yellow ochre finish (1), which is followed by the protective layer of the clear natural resin coating (2). The second finish is the graining finish: made with a yellow ochre ground coat (3), the red ochre finish (4) and the brownish clear resin coating (5). This was exposed until over painted with the last layer (6).
Note: This is the style between the panels that were grained in the same manner as the panels. This unusual treatment, which is inconsistent with the architecture of the dado, is seen on the staircase dado at present.
Sample 7: Dado, Base rail, (Dado Location 6)
Photomicrograph: Mounted sample, Olympus BMAX-50 polarized light microscope/ 10x objective, (100x total microscopic magnification) with Nikon D70 digital camera body Lexar Media 1GB flash card Dolan Jenner Fiber optics illuminator, daylight filtering
Note: The sample has been mounted in polymer resin, cut and polished to 8000-micron grit polishing cloth for additional examination. The wood substrate is seen at the base of the sample: note the first layer is the light yellow ochre color (1), which in this location is finished with the black finish paint (2, prepared with lamp black). Note the yellow ochre ground coat and the red ochre finish (3, 4) of the second finish period. This is not consistent, but may indicate a test of painting the entire dado as red graining. The base rail was finished with a second black finish (5); there is a clear resin coating on the surface that may have been added later.
Samples from the Staircase
Sample 8: Staircase: Bracket, Location 1
Photomicrograph: Mounted sample, Olympus BMAX-50 polarized light microscope/ 10x objective, (100x total microscopic magnification) with Nikon D70 digital camera body Lexar Media 1GB flash card Dolan Jenner Fiber optics illuminator, daylight filtering
Note: The sample has been mounted in polymer resin, cut and polished to 8000-micron grit polishing cloth for additional examination. The wood substrate is clearly seen at the base of the sample. This sample shows the remarkable finish of the staircase: a red ochre (1), which was coated with clear resin varnish (a thicker application). Note the surface particulate (A). There is one layer of the second finish (3). The later finishes are also visible (4, 5, 6 yellowish whites) The later white (7, note the heavy surface particulate at B) and the present light brown (8 or tan).
Sample 9: Staircase: Construction, Location 5
Photomicrograph: Mounted sample, Olympus BMAX-50 polarized light microscope/ 10x objective, (100x total microscopic magnification) with Nikon D70 digital camera body Lexar Media 1GB flash card Dolan Jenner Fiber optics illuminator, daylight filtering
Note: The sample has been mounted in polymer resin, cut and polished to 8000-micron grit polishing cloth for additional examination. The wood substrate is not present; the sample has delaminated from the substrate. The first finish yellow ochre is clearly seen (1) with the clear resin coating). There is one very faded example of the second finish (3). Layers 4 through 7 appear to be yellowish white finishes. The later white enamel (8), distinguished by the heavy surface particulate (B) and the most recent light brown (tan) (9).
Sample 10: Staircase: Bracket, Location 8 (bottom bracket)
Photomicrograph: Mounted sample, Olympus BMAX-50 polarized light microscope/ 10x objective, (100x total microscopic magnification) with Nikon D70 digital camera body Lexar Media 1GB flash card Dolan Jenner Fiber optics illuminator, daylight filtering
Note: The sample has been mounted in polymer resin, cut and polished to 8000-micron grit polishing cloth for additional examination. The wood substrate is clearly seen at the base of the sample. This lowest bracket was painted with the same black as seen on the base rail. Note that the first layer (1) is the red ochre, which was uniformly applied to the staircase construction. The finish is the lamp black (2), which later received a layer of a clear resin coating (3). The white undercoat (4) supports the second dark finish (black 5). A later black finish is also visible (6) and a varnish coating (7).
Sample 11: Staircase, Newel (Staircase Location 10)
Photomicrograph: Mounted sample, Olympus BMAX-50 polarized light microscope/ 10x objective, (100x total microscopic magnification) with Nikon D70 digital camera body Lexar Media 1GB flash card Dolan Jenner Fiber optics illuminator, daylight filtering
Note: The sample has been mounted in polymer resin, cut and polished to 8000-micron grit polishing cloth for additional examination. The wood substrate is clearly seen at the base of the sample. The first finish is clearly seen (1) made with the red ochre. The final layer (2) of the first finish is prepared with red ochre, in the oil/varnish medium, providing a glossy finish (2). The second finish is the light blue finish (3). The later yellowish white finishes (4, 5, 6) are visible and the later white finish (7) is also visible.
?
Sample 12: Staircase: Tread Location 15
Photomicrograph: Mounted sample, Olympus BMAX-50 polarized light microscope/ 10x objective, (100x total microscopic magnification) with Nikon D70 digital camera body Lexar Media 1GB flash card Dolan Jenner Fiber optics illuminator, daylight filtering
Note: The sample has been mounted in polymer resin, cut and polished to 8000-micron grit polishing cloth for additional examination. The wood substrate is clearly seen at the base of the sample. The first finish is the red ochre finish (1a, 1b). The treads may have retained the red ochre finish for a longer period, through the second finish period. The later white finishes (note that they are whiter than some of the other samples, Layers 3, 4). The later white (5, which is layer 7 on most of the samples) is clearly seen followed by the present tan (light brown). Note that there is a clear varnish coating (7).
Staircase, dado: Cross section with sample
Sample 13: Staircase Dado, (Location 1, Cap of the dado rail)
Photomicrograph: Mounted sample, Olympus BMAX-50 polarized light microscope/ 10x objective, (100x total microscopic magnification) with Nikon D70 digital camera body Lexar Media 1GB flash card Dolan Jenner Fiber optics illuminator, daylight filtering
Note: The sample has been mounted in polymer resin, cut and polished to 8000-micron grit polishing cloth for additional examination. The wood substrate is clearly seen at the base of the sample. The first finish shows the typical paint layering: the light yellow ochre finish paint, used here as the undercoat/primer (1). The red ochre (2) is the finish layer and there is a thin clear resin coating (3).
The white layer (4) is the undercoat for the second finish. The second finish is made with a yellow ochre (5) ground layer, a red ochre layer (6) and the brownish clear coating.
Sample 14: Staircase Dado, Location 3: panel reveal molding
Photomicrograph: Mounted sample, Olympus BMAX-50 polarized light microscope/ 10x objective, (100x total microscopic magnification) with Nikon D70 digital camera body Lexar Media 1GB flash card Dolan Jenner Fiber optics illuminator, daylight filtering
Note: The sample has been mounted in polymer resin, cut and polished to 8000-micron grit polishing cloth for additional examination. The wood substrate is clearly seen at the base of the sample. This sample is consistent with the panels of the dado: The first finish is the light yellow ochre color (1), protected by a layer of clear natural resin varnish (2). The second finish begins with the yellow ochre ground coat (3). The red ochre (4) is the finish layer. The brown clear coating (5) is largely of a later date, and poorly executed.
?
Sample 15: Staircase Dado, Location 4, Lower rail
Photomicrograph: Mounted sample, Olympus BMAX-50 polarized light microscope/ 10x objective, (100x total microscopic magnification) with Nikon D70 digital camera body Lexar Media 1GB flash card Dolan Jenner Fiber optics illuminator, daylight filtering
Note: The sample has been mounted in polymer resin, cut and polished to 8000-micron grit polishing cloth for additional examination. The wood substrate is clearly seen at the base of the sample. This is the lower rail, and shows a wide overlay of the red ochre layer of the second finish period.
This sample is consistent with the panels of the dado: The first finish is the light yellow ochre color (1), protected by a layer of clear natural resin varnish (2). The second finish begins with the yellow ochre ground coat (3). The red ochre (4) is the finish layer, but the actual finish is the pale blue finish layer (5).
?
The First Finish: finishes of ca. 1765
The first finishes of the Hall are very typical of the mid eighteenth century and illustrate the boldness that is seen in the remarkable woodwork. The paint finishes were made with natural ochres of good quality, but not as intense as some examples. These colors were prepared in the laboratory and are special finishes for this project.
Douglass Hall Red ochre color
Douglass Hall Yellow ochre color
Douglass Hall Black
All of the finishes, except for the black (continuous baseboard) will be given a coating of a clear glaze, using a non-yellowing acrylic glaze material.
1. Crown Molding:
All surfaces: Douglass Hall Yellow ochre Color
Clear glaze
2. Door Frame:
All surfaces (except for continuous painted baseboard, as noted below)
Douglass Hall Yellow ochre Color
Clear glaze
3. Door:
All surfaces (except for continuous painted baseboard, as noted below)
Douglass Hall Yellow ochre Color
Clear glaze
Dado: Refer to cross section for cut lines
1. Cap; Douglass Hall Red ochre color
Clear glaze
2. Moldings: Douglass Hall Yellow ochre Color
Clear glaze
3. Rail (typical): Douglass Hall Yellow ochre Color
Clear glaze
4. Panel, reveal (typical): Douglass Hall Yellow ochre Color
Clear glaze
5. Panel (typical): Douglass Hall Yellow ochre Color
Clear glaze
6. Bottom rail; (Continuous painted baseboard): Douglass Hall Black semi-gloss finish
Dado: Cross section with color indication
Staircase:
Staircase
Location 1: Bracket
Douglass Hall Red ochre Color
Clear glaze
Location 2: Side nosing
Douglass Hall Red ochre Color
Clear glaze
Location 3: Carriage
Douglass Hall Red ochre Color
Clear glaze
Location 4: Carriage, lower rail
Douglass Hall Red ochre Color
Clear glaze
Location 5: Panel construction
Douglass Hall Yellow ochre Color
Clear glaze
Location 6: Panel
Douglass Hall Yellow ochre Color
Clear glaze
Location 7: Bottom rail
(Continuous painted baseboard): Douglass Hall Black gloss finish
Location 8:
Lowest bracket: Note this element is painted as part of the continuous painted baseboard: Douglass Hall Black, gloss finish
Location 9: Newel: Lower part: this is painted as part of the continuous painted baseboard: Douglass Hall Black, gloss finish
Location 10: Newel:
Douglass Hall Red ochre Color
Clear glaze
Location 11: Riser, Douglass Hall Black, (semi-gloss finish)
Location 12: Tread, front nosing and molding under the tread
Douglass Hall Red ochre Color
Clear glaze
Note: Refer to illustration below, Riser molding detail
Location 13: Handrail (upper part, not painted) lower part
Douglass Hall Red ochre Color
Clear glaze
Location 14: Baluster
Douglass Hall Red ochre Color
Clear glaze
Location 15: Tread
Douglass Hall Red ochre Color
Clear glaze
View of the Continuous painted baseboard on the Staircase
Note: The original finish would have followed the same cut line between the paint finishes as seen below.
?
Staircase Dado, Cross section with colors:
Staircase Dado:
Location 1: Cap of Dado
Douglass Hall Red ochre Color
Clear glaze
Location 2: Molding, rail
Douglass Hall Yellow ochre Color
Clear glaze
Location 3: Panel, reveal
Douglass Hall Yellow ochre Color
Clear glaze
Location 4: Lower rail
Location 5: Lower rail
Douglass Hall Yellow ochre Color
Clear glaze
Location 6: Base Molding
Location 7: Base Fascia
Douglass Hall Black, (semi-gloss)
The Continuous painted baseboard
The Douglass House Hall retained the use of a continuous painted baseboard, in black during the first and second finish period, as well as later in the paint sequence. Some of the later black baseboard finishes are still exposed.
The continuous painted base continues at the height of the bottom rail (4 ¾" approx.) going across the door frames and the lower rail of the door.
The Second Finish Period
As seen in the cross section examination, the second finish was the period when the rudimentary graining was executed. Much of this graining has been covered with a sequence of a dark resin varnish layer, most recently poorly applied. This over-coating is relatively easily removed disclosing the original surface.
Note that the graining is seen on the Doors (Hall side) and on the Dado. It would be possible to devise a system to show some of this finish period as well as the first finish period (i.e. one door and some of the dado above the first landing of the staircase). The other woodwork finish was a light prussian blue color, and a lamp black color, virtually identical to the first finish Douglass Hall Black.
Note: the cap, panel and stile between the panels show the red "graining" finish. The surfaces that at present appear tan were painted a light prussian blue color. The base fascia was painted black.
The Second Finish Period: Exposure of the graining
The graining is a rudimentary type, showing a red layer that is nearly opaque and the "inlay line" seen on the panel of the Door, below.
?
Second finish Exposure on the landing
Note: The exposure, A shows opaque paint (the first finish, the light yellow ochre is most clearly seen), during the second finish period this was a light prussian blue color (very faded). Exposures B show the red graining and the "inlay line effect."
Second Finish Period: (probably late 18th century)
Crown Molding: Douglass Hall Light Prussian blue
Clear glaze
Door Frame: Douglass Hall Light Prussian blue
Clear glaze
Door: Red graining with "inlay line" refer to on site exposures
Dado Cap: Douglass Hall Light Prussian blue
Clear glaze
Dado Panel, Dado stile, between panels:
Red graining with "inlay line" refer to on site exposures
Dado: Base rail: Douglass Hall Black, semi-gloss (continuous painted baseboard)
Staircase:
Location 1: Bracket
Douglass Hall Light Prussian blue
Clear glaze
Location 2: Side nosing
Douglass Hall Light Prussian blue
Clear glaze
Location 3: Carriage
Douglass Hall Light Prussian blue
Clear glaze
Location 4: Carriage, lower rail
Douglass Hall Light Prussian blue
Clear glaze
Location 5: Panel construction
Douglass Hall Light Prussian blue
Clear glaze
Location 6: Panel
Douglass Hall Light Prussian blue
Clear glaze
Location 7: Bottom rail
(Continuous painted baseboard): Douglass Hall Black semi-gloss finish
Location 8:
Lowest bracket: Note this element is painted as part of the continuous painted baseboard: Douglass Hall Black, (semi-gloss finish)
Location 9: Newel: Lower part: this is painted as part of the continuous painted baseboard: Douglass Hall Black, (semi-gloss finish)
Location 10: Newel:
Douglass Hall Light Prussian blue
Clear glaze
Location 11: Riser
Douglass Hall Light Prussian blue
Clear glaze
Location 12: Molding under the tread
Douglass Hall Light Prussian blue
Clear glaze
Location 13: Handrail (upper part, not painted) lower part
Douglass Hall Light Prussian blue
Clear glaze
Location 14: Baluster
Douglass Hall Light Prussian blue
Clear glaze
Location 15: Tread: no second finish present, possibly indicating carpet runner
Staircase Dado:
Location 1: Cap of Dado: Note the dado cap is finished with the red graining. This is not the same as the dado cap in the Hall, which was painted the light prussian blue color
Red graining with "inlay line" refer to on site exposures
Location 2: Molding, rail
Douglass Hall Light Prussian blue
Clear glaze
Location 3: Panel, reveal, Panel
Red graining with "inlay line" refer to on site exposures
Location 4: Lower rail
Location 5: Lower rail
Douglass Hall Light Prussian blue
Clear glaze
Location 6: Base Molding
Douglass Hall Light Prussian blue
Clear glaze
Location 7: Base Fascia
Douglass Hall Black, (semi-gloss)
?
Restoration painting: Overpainting of the second finish
Note: Since the first finish is likely to be the principal finish for restoration, the majority of the second finish this can be accomplished while protecting the graining by using an intermediate separation layer: Soluvar conservation varnish. This can be applied and then an entirely latex acrylic paint system (primers and finishes) would be applied to the surface in the first finish color.
All of the new paint that is applied should be latex-acrylic based paint. The primer should be a type of acrylic primer that is designed to be applied over oil based paints. The attraction of the acrylic paints is that they are more easily removed.
All of the paint finishes should be matched to the Special color standards that are provided. One of the two sets of the color standards may be taken to a premium paint supplier and matched to their paint. All of the paints should be examined in natural light (dry to dry).
Recommended gloss level:
Black finish: Suggested finish, semi-gloss
All other paint finishes: Eggshell finish
The first finish showed the use of a separate clear glaze. This may be replicated as follows:
Clear glazing:
In order to replicate the clear natural resin varnish used in the eighteenth century, a layer of a modern acrylic full gloss glaze may be applied. The acrylic material that is suggested is Liquitex Gloss Medium and Varnish (acrylic polymer emulsion), in a 1:1 combination with distilled water. The result is an excellent replication of a clear natural resin varnish. The clear glaze should be applied with natural bristle flat brushes. Flat brushes were used historically for varnishing, round brushes for painting.
All of the first finish paints were coated with the clear glaze, except for the black of the continuous baseboard. This finish had sufficient oil/varnish content to create a glossy surface (Suggested modern finish: Semi-gloss).
Color standards: CIE Lab coordinates, Hunter Lab
CIE is the abbreviation for the Commission Internationale de l'Eclairage the French title for the International Commission on Illumination, which devised the CIE Lab system in 1931. It is devoted to standardization in illumination and related areas that include color.
The spectrophotometer registers color standards into a system of measuring color devised in 1931 known as CIE Lab (pronounced See-lab). CIE Lab is a uniform (opponent color scale) color space in which colors are located within a three dimensional rectangular coordinate system. The three dimensions are Lightness (L*), redness/greenness (a*) and yellowness/blueness (b*). CIE Lab is part of current CIE recommendations.
In addition to the CIE Lab coordinates, the Hunter Lab numbers are also provided. These are based on developments undertaken by Richard Sewall Hunter (1909-1991) who developed a different means of identifying color. The Hunter color space was an effort to regularize the color space: the L axis represents lightness/darkness, with absolute white at 100 and absolute black at 0. Note the drawing below that shows the means of locating any color within the Hunter color space.
On the L* a* b* color model, where a* and b* are zero (point where the axes cross), the color is gray. Gray is without chroma (i.e.: saturation of color) and has undefined hue. Moving out from gray in any direction, the color increases in chromatic strength. Hue becomes defined by the angle of departure, as noted below, from a+ that is set at 0 degrees. The distance moving out from the L axis is C* ; the angle of departure is h degrees.
All of the Spectrophotometric readings are done with the X-Rite SP-62 Sphere Spectrophotometer, Designated observer 2 degrees, Illuminant C. Illuminant C is a mathematical representation of filtered tungsten halogen (daylight). The color temperature is 6770K, simulating CIE average daylight.
?
Color Standards
In the best of all worlds, all of the color standards would have come from one source. Unfortunately, since there are approximately ten million colors that can be distinguished by the human eye this is not always possible. Because of the X-Rite SP-62 Sphere Spectrophotometer, it is possible to use all sources of color standards and to read these into the CIE Lab, Hunter Lab and Munsell Color Systems.
As it turned out, the color standards were made from stable acrylic materials in the laboratory. Two sets of the color standards are provided: one set should be retained in the report, and should remain in the offices of the Historic Preservation Trust of Berks County.
Color Standards:
George Douglass Mansion
First Finish
Ca. 1763-1765 paint finish
Special Standard:
Douglass Hall Yellow ochre color
CIE Lab coordinates
Designated observer 2 degrees
Illuminant C
L* = 62.54 a* = 5.87 b* = 21.08
Hunter Lab:
L* = 62.54 C*= 21.88 h degrees = 74.45
Munsell Conversion Number: 8.81YR6.08/3.51
Color Standards:
George Douglass Mansion
First Finish
Ca. 1763-1765 paint finish
Special Standard:
Douglass Hall Red ochre color
CIE Lab coordinates
Designated observer 2 degrees
Illuminant C
L* = 37.88 a* = 9.89 b* = 7.82
Hunter Lab:
L* = 37.88 C*= 12.61 h degrees = 38.33
Munsell Conversion Number: 0.02YR3.68/2.23
Color Standards:
George Douglass Mansion
First Finish (and Second Finish)
Ca. 1763-1765 paint finish
Special Standard:
Douglass Hall Black Suggested gloss level: Modern semi-gloss
CIE Lab coordinates
Designated observer 2 degrees
Illuminant C
L* = 25.23 a* = -0.41 b* = -1.18
Hunter Lab:
L* = 25.23 C*= 1.25 h degrees = 251.01
Munsell Conversion Number: 8.64B2.46/0.28
Color Standards:
George Douglass Mansion
Second Finish Period
Special Standard:
Douglass Hall Second Finish Light prussian blue color
CIE Lab coordinates
Designated observer 2 degrees
Illuminant C
L* = 63.23 a* = -5.67 b* = -10.16
Hunter Lab:
L* = 63.23 C*= 11.64 h degrees = 240.83
Munsell Conversion Number: 8.89B6.15/3.04
?
Addendum: Second finish period graining
The graining exposures in the Hall show a simple red ochre layer applied over a yellow ochre ground coat. The simplicity of the graining contrasts with a very elaborate and expert example of graining that appears to date to the early nineteenth century on the second floor. Usually, the best graining is done in the most public space. This conundrum may become more clear with additional examination of the interior finishes.
Examples:
Hall: Second finish period graining exposure, first floor (south west) Door, Original Hall side
Second Floor: North west Door, Room Side
Note the complicated and expert execution of this graining.
Second Floor: North West Room, Door, room side: detail
?
Addendum:
Note on the plaster: Suggested lime whitewash
The plaster ceiling and walls were finished with lime whitewash, applied carefully in a thin application. It is suggested that a lime whitewash be used:
A natural hydraulic lime whitewash should be used. An example is: St. Astier "Natural"
The recommended source is:
Limeworks.us 215-536-6706 www.limeworks.us
The Historic Preservation Trust of Berks County, PA., Project ME Number 16709
George Douglass House Project work Accomplished October 1, 2018 to December 31, 2018
All stable original plaster wall panels on 2d floor: remove non-period coatings and preserve plaster on original lath on several stable wall segments. Balance of this work to be completed in 1st and 2d quarters of 2019.
See attached schedule of change orders and extra work accomplished during 4th quarter of 2018.
Continuing plasterwork begun in the 3d quarter of 2018, the following significant progress was made in plastering [base coat] the exterior coved cornices on the primary façade and northern gable-end, and progressing with base coat and finish plaster on interior chamber and hallway walls on the 2d floor:
Front right [NW, “best”] chamber (with corner fireplace):
Stabilized plaster walls; all walling: removed unstable plaster from cracks [photo #1]; repaired cracks and gaps at wall intersections with lime plaster; repaired plaster around fireplace; infilled behind baseboard along front [SW] stone wall; Remove material from inside corners to stable margins; repaired with lime plaster. Scratch coated and brown coated interior stone wall along front of chamber. Removed rotted and unstable wood lath on exposed ceiling [photo # 64] and re-lathed with recycled hand split lath found in attic. Applied plaster washers where needed to mitigate de-lamination. This work will continue in 1st and 2d quarters of 2019 to finish plaster on restored walls.
Front left [SW] chamber:
Stabilized plaster walls; Remove unstable plaster in cracks; Repair all cracks with lime plaster.
Infilled behind baseboard front [SW] wall; removed material from inside corner gaps to stable margins and repaired with lime plaster. Applied scratch coat and brown coat to stone wall between windows at front of chamber [photo #67]; Removed rotted and unstable wood lath from exposed ceiling; re-lathed with recycled hand split lath; Applied plaster washers where needed. This work will continue in 1st and 2d quarters of 2019 to finish plaster on restored walls.
Rear right [NE] chamber Column infill:
Applied wire lath over steel column and scratch coat, brown coat, and troweled finish coat to match original surface.
Rear right [NE] chamber with fireplace:
Applied plaster washers where needed to effectively mitigate de-lamination; installed wire lath over steel column and scratch coat, brown coat, and troweled finish coat to match original surface; opened cracks to stable margins and in-filled with lime plaster; performed plaster and lath repairs around fireplace; removed later paint down to original plaster on two walls above and below chair rail to accept new base coat and finish coat plaster; applied base coat plaster to two interior walls above and below chair rail; applied lime plaster troweled finish coat plaster to two walls above and below chair rail; stabilized and prepared ceiling damage for restoration with plaster over original, replaced, and restored hand-hewn lath.
2d-floor Hallway:
Installed wire lath over steel column, scratch coat, brown coat, and finish coat to match original surface; open all wall and inside corner cracks to stable margins; repaired opened cracks with lime plaster; Re-lath ceiling damage and prepare for restoration and consolidation of sub-strate, and base and finish plastering.
All new interior plaster applications were continuously heated to 50 degrees F. or above during critical cure-periods.
Outside cove cornice:
A. Front façade of 1765 structure: stabilize all salvageable intact plaster; removed rotted lath and re-lathed with hand split recycled lath; applied base [“scratch”] coat and brown coat. [photo #59, before and # 8, after].
B. North Gable-end [with date-plaque] Cove Cornice – Removed rotted lath and re-lathed with hand split recycled lath; stabilized salvageable loose plaster; restoration to be completed in spring, 2019.
GEORGE DOUGLASS HOUSE: Approved Plasterwork Changes and Extra work Completed to 12/31/18
Project ME Number 16709
I. Front façade cove cornice-1765 original Structure:
A. Removed all deteriorated lath and unstable plaster from façade coved cornice segment above front door to southern terminus of cornice.
B. Preserved and re-contoured 11 original coved-bracket outlookers to accept hewn lath and adequate plaster thickness.
C. Fabricated reduced-scale module [photo # 67] with hewn lath, coved brackets, and two alternative finish plaster coatings to match original texture, color tone, and aggregate granulation.
D. Applied three sample finish coats [photo #75] on cove cornice lath for comparison to original in-situ plaster.
II. 2nd floor NE rear chamber:
A. Infilled closed later-period doorway through partition; applied hewn wooden lath over planking [photo # 62]; applied scratch coat, brown coat, and finish coat above and below chair rail within closed doorway. Stabilized surrounding plaster.
B. Applied base coat and finish coat to two walls above and below chair rail where crack repair had been previously attempted.
C. Scraped paint off two wall segments down to original stable plaster to be preserved.
III. 2nd floor doorway between northern front [“best”] and back chamber:
A. Applied hewn wooden lath over planking within closed doorway in partition between chambers;
B. Applied base coat [photo #2], brown coat, and finish coat above and below chair rail; stabilized surrounding plaster.
IV. Since the time of application of the first coatings of lime-based or distemper paint to interior plaster is unknown, painting or lime-washing interior plaster will be deferred until further evidence is obtained and coating formulation is determined.
The net additional cost for the above changes and extra work to 12/31/18 is $2847.50.
Note: no contract for painting has been awarded.
Larry Ward
PENNSYLVANIA HISTORICAL AND MUSEUM COMMISSION
KEYSTONE HISTORIC PRESERVATION GRANT PROGRAM
QUARTERLY STATUS REPORT FORM
The Historic Preservation Trust of Berks County, PA., Project ME Number 16709: George Douglass House Restoration Project work accomplished October 1, 2019 to December 31, 2019: During this quarter substantial progress was achieved in first floor parlors, kitchen, and early store room in the categories of interior plasterwork, joinery, and painting with scientifically and precisely determined original colors:
INTERIOR PLASTERWORK: For the entire project the primary preservation objective is to retain, stabilize, secure, and whitewash original plasters coatings soundly anchored in original hand-split lath and in a reasonably regular plane, and to re-plaster or re-coat only severely degraded, unstable, or otherwise un-salvageable early plaster. Reasonably intact original plaster will be preserved and exhibited un-coated.
1765 KITCHEN [SE QUADRANT]: Applied lath where necessary and repaired plaster on kitchen walls above and below chair-rail and above fireplace. Applied lath, scratch coat, brown coat to the re-created “bratticed” board partition above the chair rail [Photos # 28 & #9]. Removed lath and re-lathed deteriorated and detached or de-laminating ceiling plaster adjacent to the re-constructed partition; applied scratch and brown coats. Removed lath and applied re-purposed sawn lath to disturbed or compromised section of intersecting hallway wall adjacent to partition.
c. 1768-C. 1798 AMITY STORE [SW QUADRANT]:
(A) Missing plaster on the three original walls was replaced with a lime plaster “scratch” coat base, and a “brown” coat of lime plaster with an animal hair binder, keyed for a finish coat of lime plaster without additives. More extensive fractures were bridged with a base coat consolidated with a chemically neutral mesh tape and a finish coat. (B) A Structural steel column in the corner of the partition was bridged over with re-purposed sawn lath run into the corner joint with the hallway wall to provide lateral rigidity to the partition [Photo #2]. All stabilized early plaster with discoloring surface accretions in the store will be gently brush-cleaned with water in preparation for lime-based whitewash in 2020. (C) The ceiling is severely compromised by many hairline and open cracks, thin covering over lath, and random detachment and deflection from the ceiling plane; the surviving plaster will be secured and re-aligned in the ceiling plane with recessed plaster washers, and re-coated, after application of mesh tape closure over re-filled open cracks. (D) All wallpaper remnants were removed from ceiling [Photo #2a]; adhesive residue to be reduced as much as feasible without abrasion or chemical cleaning agents or risk to the early plaster sub-strate.
CARPENTRY AND JOINERY: Carpentry and joinery work in the 4th quarter focused on milling and fitting the fine paneling, cornice, and moldings preliminarily installed in the NW front [“best”] parlor in the 3d quarter, and preliminary installation of faithfully replicated joined woodwork in the family [“back”] parlor. Original segments of 1765 woodwork survive intact and in-situ in both parlors, providing three-dimensional templates for re-fabrication of replacement components. Each new element in the best parlor is fabricated and molded from an original fragment or complete module in its un-modified construction and molding profile. As determined to be the authentic original colors by consultant Matthew Mosca, Deep Prussian Blue and Moderate-Light Gray colors were applied to panel fields, stiles, rails, and molded architraves and panel transitions [Photos #4, showing replicated wainscot and baseboard on best parlor partition; and Photo # 2b, showing paneling above the fireplace, molded cornice, and wainscot paneling]. Period panel fields in the best parlor were originally decorated with a medium-blue vernacular “marbleizing”, some surviving, which will be studied, curated, and replicated by traditional techniques of the period. Photo #14 shows the related fireplace paneling in the back parlor, and the aprons of the chair rail and cornice assembly, also painted in photo-microscopically determined original “Spanish brown” color.
Larry Ward
PENNSYLVANIA HISTORICAL AND MUSEUM COMMISSION
KEYSTONE HISTORIC PRESERVATION GRANT PROGRAM
QUARTERLY STATUS REPORT FORM
Project ME Number: 16709
Name of Property/ Project: George Douglas House/ Restoration Project
Period Covered: From October 1, 2017 To December 31, 2017
Grantee: The Historic Preservation Trust of Berks County, PA
Address: PO Box 245, Douglassville, PA 19518
Contact: Larry Ward, Project Director Phone: (610) 223-0123
Accomplishments to date:
1. Fabrication of 24” x 36” Project Funding Sign per PHMC template [photograph attached].
2. Preparation and submittal of 13 sheets of project detail drawings, elevations, perspectives, with specification, material, and detail notes.
3. Fabrication and installation of two white oak joists in south parlor replacing deteriorated and structurally deficient original joists. Temporary floor boards have been set on the new joists for safety during the project work.
Revised work schedule, if appropriate: None to date.
___________________________________ _January 2, 2018
Signature: Larry Ward Date
_Project Director_______
Title
Images attached:
24” x 36” Project-Funding aluminum sign.
#008: Two replacement Joists under south parlor [counting from right: first and third joists, on props, with lighter oxidation, will be leveled, plumbed, and bedded in mortared wall pockets when weather permits.
#004: temporary floor boards aligned against front wall of south parlor, to be replaced with permanent flooring after all supporting joists are leveled and bedded in wall pockets.
Larry Ward
George Douglass House Accomplishments April 1 to June, 30, 2018:
During the 2d quarter of 2018, restoration carpenters Tom and Chris Lainhoff achieved significant progress toward restoring safe, stable, and historically and architecturally authentic flooring in the northwest [“best”] parlor of the house. A majority of the original floor boards have been preserved and structurally consolidated. The restored and replacement boards [Photo #86] will be re-set on mostly original joists, which have been extended where ends had rotted, and have been reinforced (“sistered”) where necessary [photo #41]. The stabilized joists were then re-set in bearing sockets in the masonry foundation walls, or bedded on the stone vault supporting the hearth [photo #22).
The original and some replacement boards were re-leveled to the original plane of the adjacent center-passage/hallway. Old tongued-and-grooved boards of the same species of poplar as the originals were acquired from regional sources and padded-out on their under-sides to meet the re-leveled floor-plane. Considerable shop-work was required to achieve an acceptably functional stability and dimensional conformity between the original boards and the replacements.
Cutouts for 19th century heating vents and stove-pipes and 20th century ductwork [Photp #90] will be patched-in, utilizing the nearly invisible joinery methods applied in the hallway floor restoration. This process will complete the floor system in the formal northwest parlor and will afford a set of gauged datum points as calibrated references for the wainscot and other paneling and plasterwork to be restored to walls and ceilings.
Degraded and late-period plaster has been removed from wainscot and upper wall areas [Photo #91] to prepare for re-plastering with traditional lime mortar, commencing in the 3d quarter of this year.
Larry Ward
The Historic Preservation Trust of Berks County, PA., Project ME Number 16709
George Douglass House Project Work Accomplished April 1, 2019 to June 30, 2019
PLASTERWORK:
During the 2d quarter of 2019, the project plasterer, William Smith of Brandywine Historic Services, made substantial progress in the interior work, completing urgent restoration of wall and ceiling integrity in the 2d floor chambers and hallway [Photo #12].
Preparation included removal of remaining later coatings and accretions of lime wash, paint, wallpaper adhesive, coal-soot, and soiling from original finish plaster that was sufficiently stable and well-anchored on the masonry wall substrate. Original 1765 plaster soundly anchored to the naturally-keyed exterior stone walling and with a reasonably regular plane, will remain un-coated. The only modification to the preserved original plaster surfaces will be spot-patching abraded and “cratered” blemishes with finish plaster tinted to match as closely as feasible the original off-white tone of the early plaster. The infill plaster will be feathered into the surrounding original surface, very lightly textured only by original trowel-tooling. A similar tint is still under consideration for a wash coating of the re-plastered partition wall surfaces.
As established as the appropriate technique in the 1st quarter of 2019, unstable, de-laminated, and deflected plaster was restored to the proper ceiling-plane in the chambers with recessed washers where necessary. Missing plaster was infilled with a lime plaster base [“brown”] with a hair binder, and a “scratch” coat keyed for finish coating of lime plaster. Finish coatings were applied to the re-anchored and leveled ceilings in all chamber and hallway spaces on the 2d floor. Fractures were bridged with base and finish coatings after consolidating with a chemically neutral mesh tape. By the end of June, 2019, plaster restoration on the 2d floor, begun in the first quarter of the year, had progressed through all plaster walling and ceilings in the chambers and passage-hallway. Remaining detail work on the 2d floor will be completed in the 3d quarter of 2019 preserving original stable plaster and by stabilizing and re-coating compromised segments.
CARPENTRY AND JOINERY: During the 2d quarter of 2019, the project carpenters concentrated on the shop-work and milling of floor boards necessary to achieve a level and solid floor composed of original boards in the best [front] parlor. Quarter-sawn oak boards of the same species and width-range as the originals will be used, if and only to the extent necessary to complete the floor. Severely-worn boards and erratic joist alignment required long shims of varying thicknesses to achieve an acceptably leveled restored flooring plane [photo # 28]. Flooring restoration in the best parlor will be completed in the 3d quarter of 2019. As a primary preservation objective, the same nail-holes in the floor boards and their counterparts in the joists will be used in nailing original boards to joists; later nail holes from re-flooring will be filled with wooden plugs. This process will be guided by board-location mapping recorded on a meticulous survey by the carpenters before lifting boards from joists. A set of 19th century oak boards, similar to the originals, will be installed in the back parlor in the third quarter. Re-created “wainscot” paneling [named for its similarity to board panels lining English crop-wagons (“wains”)] will be applied to the original plank-work partition between the best parlor and hallway [photo # 29]. By the end of June, the lath, chair rail, and baseboard had been installed on the kitchen side of the new “bratticed” (alternating-plank) partition between the kitchen and the adjacent front room originally housing the “Amity Store” in the late 1760s [Photo #25]. This wall is now ready for re-plastering.
See attached Revised Work Schedule for the sequence of future project work.
HISTORIC PRESERVATION TRUST OF BERKS COUNTY-GEORGE DOUGLASS HOUSE RESTORATION REVISED WORK SCHEDULE-June 30, 2019
During the first half of 2019, it became apparent that the early plaster in 2d floor chambers and hallway was considerably more degraded and less securely anchored than anticipated. A similar and equally unexpected level of foot-wear, deterioration, and deformation appeared in the floor boards in the front [“best”] and back [“family”] parlors. These deficiencies required extraordinary measures and substantially more time for restoration and, in the front parlor, for re-use of original boards in their original locations. Based on these conditions, rather than “consolidating sound floor boards in the two northern parlors” as planned and set forth in the original project description, it was decided to:
(a) consolidate, re-install, and restore to a level plane, the vast majority of original boards in the front [“best”] parlor, and
(b) replace back parlor boards, most of which proved to be severely degraded, with available boards from a 19th century structure which are similar in width and oxidized patina to the originals.
The following project history and circumstances explain the necessity for modifying the project sequence in both woodwork and plasterwork categories, and for seeking an extension of the time for completion.
CARPENTRY AND JOINERY:
Front (NW) parlor: The majority of the boards in the best parlor required substantially more shop-work and on-site carpentry and joinery to conserve, functionally restore, re-nail, and level in their authentic locations, as recorded in a survey and mapping of the flooring by the project carpenters prior to removal. This process will achieve the desired preservation objective of salvaging, effectively restoring, and re-placing the vast majority of the original quarter-sawn oak boards in their original locations, supplemented with the minimum number of old oak boards necessary to complete the floor. The final phase of nailing-in the restored original and replacement boards will be completed in the 3d quarter of 2019.
Back (NE) parlor: Most of the original boards are too degraded, worn, or functionally compromised to continue in use without prohibitively time-consuming and expensive board-by-board “working” and consolidating. They will be replaced by available quarter-sawn oak boards of similar width to the originals and of a similar oxidized color and natural patina. Original boards will be preserved as historic artifacts and for possible conservation and use in a future restoration campaign.
Other Woodwork: The lack of stable flooring also delayed the installation of “wainscot”, over-mantle paneling, chair rail, baseboards, and other mouldings and mill-work in the two parlors. These wooden elements will be fabricated using surviving original components as templates, and must be installed before the plaster margins can be established, delaying the plaster restoration in significant segments of the wall ranges in the parlors and in the front store-room. The final margins of new plasterwork on the kitchen-store partition have been set by the new chair rail and baseboard applied between lath ranges on the kitchen plane of the wall.
PLASTERWORK:
The process described above has delayed the commencement of plasterwork scheduled for the two parlor spaces until the restored and replaced floor systems are fully installed. This phase of the flooring campaign will be completed in the coming months. The balance of woodwork restoration and replication in the parlors will be completed by the original or extended deadline for completion of the project.
2d floor plaster restoration:
As a direct result of the above-mentioned conditions and delaying factors, plaster restoration and stabilization in the four 2d floor chambers and hallway, especially the ceilings, were considered urgent priorities. The testing process on the ceilings in all five spaces had determined that much of the plaster had deflected or partially de-laminated from the lath, or had become fractured, leaving separation between margins of larger cracks. Each chamber had experienced at least one collapse of an irregular slab of plaster onto the floor. The ceilings and some wall-ranges were stabilized by recessed plaster washers and mesh-tape where indicated.
Plaster on chamber and hall walls was preserved in-place where substantially intact and well-anchored in lath or on the stone substrate of exterior walls. Later-period whitewash, paint layers, wallpaper and adhesive residue were removed and cracks repaired. Distressed plaster on walls has been restored, stabilized, and re-coated to utilize most efficiently the scaffolding erected in each space to provide a platform for the ceiling work. Stable and reasonably intact and well-anchored original wall plaster will be left un-coated, since there is no unequivocal evidence that the plaster surfaces were lime-washed or painted in the early period of the house. Blemishes and minor “craters” will be leveled to the wall-plane with finish plaster tinted to the ambient color tone of the original surface. Other than this detail work, plaster conservation and restoration on the 2d floor has been substantially completed as of June 30, 2019. Wall and ceiling integrity has been substantially restored in the chambers and upper hallway.
The process, materials, and costs of this 2d floor plaster restoration campaign are reflected in the quarterly reports and Invoices submitted through the 2d quarter of 2019, with supporting photographs and other documentation for each period.
Coved cornice restoration:
A majority of the plaster remaining on the exterior coved cornice crowning the primary façade proved to be insufficiently anchored [“keyed”] in the concave lath profile. After repair or replacement of some of the original lath, the cornice had to be re-plastered from above the facade doorway to the southern terminus of the 1765 roof-line. The exterior cornice work, consisting of consolidation and anchorage of salvageable original plaster and re-plastering voids and degraded areas on the three elevations with coved cornices, will be completed during the 3d quarter of 2019.
Project Completion:
As the result of the scheduling challenges summarized above, it would be quite difficult to complete the project work, as now amended, by the initial September 30, 2019 deadline. As much of the remaining interior plasterwork and woodwork as possible will be substantially completed in the 3d quarter of 2019, including applying lath and plaster to the two new ”blind’ partition walls between the two parlors and between the kitchen and the early store room. Provided that an extension of the time for completion is granted, the balance of the project work, including paneling, mouldings, and wainscot in the parlors, will be completed and funded during the extension period.
Larry Ward
The Historic Preservation Trust of Berks County, PA., Project ME Number 16709
George Douglass House Project work Accomplished January 1, 2019 to March 31, 2019
During the 1st quarter of 2019, our project plasterer (working on his 20th National Register structure) made substantial progress in the interior work, restoring wall integrity in the 2d floor chambers and hallway.
This work continued during this quarter with the sensitive removal of later coatings and accretions of lime wash, paint, wallpaper adhesive, coal-soot, and soiling from original finish plaster that was sufficiently stable and well-anchored on the masonry wall substrate [photo #25, 2/15/19]. The original lime-plaster, exposed by this process for the first time in over two centuries, appears to express a soft off-white or light ivory/grey tint, possibly from a small component of local clay, which is a light amber-brown. Under consideration is the application of similarly tinted lime wash to the new plaster finish on walls in the same chamber in order to conform all surfaces to original tonal qualities of surviving intact plaster as much as possible, and to preserve and exhibit historically authentic original surfaces in proximity to new plasterwork.
Unstable, de-laminated, and deflected plaster was restored to the proper ceiling-plane with recessed washers where necessary, and missing plaster was infilled with lime plaster base [“scratch”] and finish coatings. Paint and other accretions were scraped off early plaster surfaces, which were then washed with clear water and air-dried with the aid of shop heaters that also provided effective curing temperatures. Fractures were bridged with base and finish coatings after taping. The large area of missing plaster [photo#52, 11/9/18] in the NW chamber ceiling was re-plastered with a brown-coat lime plaster mix [photo # 6, 3/14/19] , and a thin finish coat applied after the base coat had adequately set-up.
Platform-scaffolding was erected in each room as work progressed [photo# 21, 4/6/19], and the room temperature consistently maintained above 50 degrees F. during the curing [“setting up”] period for applications of plaster. Defective or missing lath was replaced or stabilized in-place. Historically authentic lime plaster was employed for the base and finish coatings, reinforced with animal hair as found in the original 1765 plaster composition. Each chamber was warmed to 50 degrees+ throughout the curing period for new plaster. Later coatings of paint, wallpaper glue, and fossil-fuel accretions have been removed from several hundred square feet of stable and intact original plasterwork on chamber walls. These wall ranges, fine specimens of pre-Revolutionary War American vernacular craftsmanship, will be preserved as a permanent in-situ exhibit demonstrating undisturbed architectural fabric and un-coated original plaster surface. A segment of original early lath will remain exposed behind Plexiglas in the NW back-chamber as an exhibit of authentic 1765 hand-hewn lath and hand-wrought “rose-head” nail fasteners.
A doorway between the two northern chambers was determined to be not original to the pre-Revolution period and was closed up with planking and lath [photo # 62, 11/9/18] and plastered over. Chair railing conforming to the surviving 1765 profile was applied across the former doorway opening [photo #25, 4/6/19]. “Blind” partitions, lacking passage doorways and providing privacy and separation of domestic from mercantile functions in adjacent spaces, were installed between the two northern chambers on the 2d floor, and between the kitchen and southwestern front (“store”) room on the first floor [photo # 33, 4/6/19, showing planking ready for lath].
By the end of March, 2019, plaster restoration on the 2d floor of the George Douglass House, both in terms of preservation of original plaster and stabilizing and re-coating compromised segments, had progressed through the majority of plaster walling in the chambers. In addition, 3 of the 4 ceilings had been stabilized, leveled, and re-plastered. All stable original plaster wall segments on 2d floor were restored by removal of non-period coatings and preserving un-compromised plaster on original lath in acceptably uniform plane.
Larry Ward
George Douglass House Restoration Accomplishments, July 1 to September 30, 2018
During the 3d quarter of 2018, the primary restoration focus has been devoted to:
A. Exterior: Restoring the plastered cove cornice on the primary façade; photo #19 shows a run of the cornice on the primary façade before restoration, with missing and damaged plaster and lath.
The restoration process required removal of degraded early plaster and later plaster composed of modern cements or other inauthentic materials. The re-plastering technique, based on large fragments of the original lathed and plastered cornice found in the house [photo # 4689], involved application of three coats to the original, repaired, and replacement lath nailed to concave and cantilevered wooden brackets formed at the ends of attic joists. The arc-profile lathed armature provides anchorage for the consolidated and replaced lime plaster integrated into the fabric of the cornice. The plaster layers, a mix of lime, a sand-based aggregate, and water, consisted of:
1. A thin base coat keyed into the hand-riven interstices between lath strips;
2. A built-up “scratch” coat of lime plaster troweled to the varying-radial profile of the cove established by the supporting brackets; the gritty matrix consisted of a coarse aggregate bound by the lime with goat-hair. After partial curing, this layer was incised (“scratched”) to provide keying for better anchorage of the fine and thin coating of finish lime plaster.
3. After curing, the scratch coat will be covered with a fine-aggregate finish plaster and “washed” with a naturally-tinted lime paint. The ingredients for the brushed-on lime paint were determined by microscopic analysis performed by Matthew Mosca, Historic Paint Finishes Specialist of Artifex, Ltd. to be the correct first-period surface. Photo # 5 shows the cornice on the main façade after application of the base and “scratch” plaster coatings.
B. Interior: Preparing the interior walls, ceilings, and unstable sections of the hallways and 2d floor chambers for re-lathing and application of the traditional three-coat plaster walling described above.
Progress on this phase of the project in the 2d floor hallway and chambers during the past 3 months includes:
1. Raking out cracks to the adjacent margins of intact and solidly anchored plaster adequately keyed into undisturbed lath [photo # 19 shows early riven lath found in the 1765 attic which will be used for replacement of broken and detached lath throughout the plaster restoration campaign; photo # 13 shows an 18th century wrought nail with a hammered “rose-head” from early riven lath in the wall]; replacement nails, where necessary, will be fabricated of the same essential material and wrought-form as the originals.
2. Removal of degraded, de-laminated, and late-period plaster from ceilings, wainscot, and wall areas.
3. Photo # 25 shows a delaminated section of wainscot plaster below the chair rail in a back-chamber. The loose plaster has been removed and the exposed lath perimeter has been squared, will be framed in lath and covered with Plexiglas to provide an in-situ exhibit of original 1765 hand-riven lath secured by surviving intact wrought nails with hammer-marked domed heads. The nails display light surface oxidation from the moisture in the plaster as it cured, but minimal corrosion or compromised integrity after 253 years of service.
C. Interior Carpentry and Joinery: will include: (a) Repair, gauging to thickness, leveling, and restoration of tongue-and-groove flooring in western segment of NW [“best”] parlor; and
(b) Preparation and commencement of millwork for chimney-piece paneling and wainscot [“dado”] in NW parlor.
Larry Ward
The Historic Preservation Trust of Berks County, PA., Project ME Number 16709
George Douglass House Project Work Accomplished July 1, 2019 to September 30, 2019
Addendum to 3d Quarter 2019 Report
PLASTERWORK:
Interior: During the 3d quarter of 2019, the project plasterer, William Smith of Brandywine Historic Services, made substantial progress in the interior work, including restoration of wall and ceiling integrity in the 1st floor kitchen. Specific accomplishments include: (A) Determining which original 1765 plaster ranges are soundly anchored in original hand-split lath and in a reasonably regular plane; these plaster segments will not be re-coated with new plaster. (B) Raking out and infilling significantly cracked plaster, aligning the margins into the surrounding original surface, all work very lightly textured only by trowel-tooling sufficient to meet the ambient wall-plane. (C) Deteriorated, de-laminated, and deflected plaster was restored to the proper ceiling-plane in the kitchen with recessed washers where necessary. (D) Missing plaster was infilled with a lime plaster “scratch” coat base [Photo # 7, 7/2619-kitchen partition], a “brown” coating of lime plaster with an animal hair binder, keyed for a finish coat of lime plaster without additives. (E) More extensive fractures were bridged with a base coat consolidated with a chemically neutral mesh tape and a finish coat. Structural steel columns, rectangular in section, received wire-lath for anchorage [“keying-in”] of base-coat plaster. (F) The kitchen side of the new partition separating it from the store-room was lathed with re-purposed early split lath [Photo # 9, 7/11/19] and plastered with base and finish coatings. [G] Kitchen ceiling plaster was anchored with washers where necessary, consolidated, and 3 plaster coatings were applied as necessary to receive whitewash in 2020. All stabilized early plaster with discoloring surface accretions will be gently brush-cleaned with water in preparation for lime-based whitewash in 2020.
Exterior: [A] A finish coat of non-pigmented [un-tinted] lime plaster was applied to the cove cornice above the principal façade [Photo # 3, 10/2/19]. [B] On the northern eaves-to-eaves gable-end cornice, original well-anchored plaster segments were retained; plaster voids and re-lathed areas were re-plastered with scratch, brown, and finish coatings; cracks were repaired as above in preparation for finish coating or whitewash [Photo # 41, 8/26/19]. This gable-run of coved cornice will be whitewashed in the first half of 2020. [C] The short run of coved cornice on the exposed western half of the southern gable was similarly treated, applying new plaster coatings where necessary [Photo #4, 10/2/19]. [D] The western [back] “eaves” wall cornice has retained a substantial proportion of its original plaster. Lath defects and gaps, plaster delamination, cracks, and voids in this (and all) cornice segments were remedied by consolidation, washered, re-setting into plane, or replacement. [E] Deteriorated lath and temporary metal “weather” coverings were removed and replaced with old lath.
Most cornice plaster has now been prepared for whitewashing in 2020, after a six-month cure-period and necessary infill at margins.
CARPENTRY AND JOINERY: Carpentry and joinery work in the 3d quarter focused on the fine paneling and moldings in the NW front [“best”] parlor. Significant segments of original 1765 joined woodwork survive intact and in-situ in parlors and 2d floor chambers. Each wooden element in the best parlor is represented by an original fragment or complete module in its un-modified construction and molding profile. All replicated paneling and molding details have been milled and molded, and will be fitted and installed (or re-installed if original) in the 4th quarter of 2019. Paint analysis by consultant Matthew Mosca has determined the original Deep Prussian Blue and Moderate-Light Gray colors for panel fields, stiles, rails, and molded architraves and panel transitions [Photo #15, 8/30/19-replicated wainscot and baseboard on best parlor partition]. Based on a recent discovery by carpenters Tom & Chris Lainhoff, period panel fields in the best parlor were originally decorated with a medium-blue vernacular “marbleizing”. Once verified, curated, and color-matched by the Trust’s paint consultant, this treatment will be applied to corresponding fields of replicated panel-work.
Larry Ward